발표가 다가오는데 PowerPoint에서 사진의 배경을 어떻게 제거하는지 궁금하신가요? 도와드리겠습니다. 배경을 제거할 수 있는 두 가지 옵션이 있습니다: 배경 제거 도구 를 사용하거나 투명 색상 기능을 사용할 수 있습니다 — 두 가지 방법 모두 안내해 드리겠습니다.
마음에 들지 않았을 때 어떻게 변경사항을 되돌릴 수 있는지도 배우게 될 것입니다. 이 기능은 PowerPoint의 데스크톱 버전에서만 작동한다는 점을 기억하세요. 그러나 OneDrive를 사용하는 경우에 대한 해결책도 소개할 예정입니다.

먼저 PowerPoint에서 사진 배경을 제거하는 것이 프레젠테이션의 완성도를 높이는 데 왜 최고의 방법인지 살펴보겠습니다. 그런 다음 PowerPoint에서 사진 배경을 제거하는 구체적인 방법과 진행 과정을 자세히 알아볼게요. 마지막으로, 그다음 단계에서 프레젠테이션을 한층 더 발전시킬 수 있는 최고의 팁도 소개해 드리겠습니다.
목차
- 파워포인트 프레젠테이션에서 이미지 배경을 제거하는 방법을 알면 좋은 점
- PowerPoint에서 투명한 색 설정 도구로 이미지의 흰색 배경을 제거하는 방법
- PowerPoint에서 이미지 배경을 제거하는 방법: 배경 제거 도구
- PowerPoint에서 이미지 배경 제거 — 언제 잘 작동하지 않을까요?
- 온라인에서 사진의 흰색 배경을 제거하고 PowerPoint에 업로드하는 방법
- PowerPoint에서 이미지 배경 제거 실행 취소하기
- PowerPoint OneDrive에서 작업할 때 온라인으로 배경을 제거하는 방법
- PowerPoint 프레젠테이션 꿀팁 - PowerPoint에서 배경을 제거한 후 해야 할 일
파워포인트 프레젠테이션에서 이미지 배경을 제거하는 방법을 알면 좋은 점
PowerPoint에서 사진의 배경을 제거하면 여러 가지 장점이 있습니다. 어떤 장점은 바로 눈에 띄지만, 조금 더 미묘한 장점도 있죠. 전반적으로 프레젠테이션을 더욱 창의적으로 만들 수 있는 새로운 방법을 열어줍니다.
슬라이드 공간을 더 넓게 활용하세요
사진의 배경을 즉시 제거하면 주요 피사체는 그대로 유지하면서 이미지가 더 작아집니다. 이렇게 하면 슬라이드의 디자인이 더 깔끔해질 뿐만 아니라 텍스트를 넣을 공간도 더 많이 확보할 수 있습니다.
창의적이고 독특한 감각을 더해보세요
PowerPoint에서 사진의 배경을 제거하는 것은 청중에게 깊은 인상을 남길 수 있는 전문가다운 한 수입니다. 이 기능을 활용하면 프레젠테이션을 더욱 창의적으로 꾸미고, 나만의 특별한 감각을 더해 청중의 몰입도를 높이는 동시에 메시지를 오래 기억에 남게 만들 수 있습니다.
스톡 이미지 대신 직접 준비한 이미지를 사용하세요
사진의 배경을 빠르게 제거할 수 있으면 손에 넣을 수 있는 거의 모든 이미지를 활용할 수 있습니다. 그러니 투명 배경의 스톡 사진을 사용하는 대신 직접 촬영한 사진으로 프레젠테이션을 나만의 스타일로 완성해 보세요.
프레젠테이션에 개성을 더하세요
프레젠테이션 슬라이드에 제스처를 취하는 자신의 사진을 추가하면 나만의 개성을 더할 수 있어요. 청중에게 웃음을 줄 수도 있고, 나와 나의 퍼스널 브랜드를 더 오래 기억하게 만들 수 있죠. 특히 직접 발표하지 않고 다른 사람이 훑어볼 수 있도록 슬라이드만 보내야 할 때도 아주 유용합니다.
PowerPoint에서 투명한 색 설정 도구로 이미지의 흰색 배경을 제거하는 방법
PowerPoint에서 이미지의 흰색 배경을 제거하는 방법이 궁금하신가요? 가장 간단한 방법은 투명한 색 설정 도구 를 사용하는 것입니다. 단색 배경의 이미지라면 이 방법이 완벽하게 작동합니다. 그렇지 않다면 다음 단계로 넘어가세요.
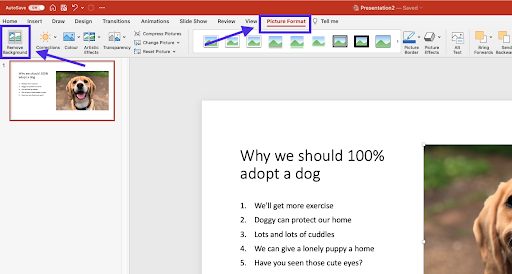
시작하려면 먼저 PowerPoint에 사진을 업로드한 다음, 사진을 클릭해 선택하세요.
2. 이제 그림 서식 탭으로 이동합니다.
3. 색상 드롭다운 을 클릭하세요. 하단에 투명 색상 설정이라는 옵션이 표시되면 선택하세요.

4. 이제 제거하려는 사진의 배경색을 클릭하세요.
완료되었습니다! 이제 사진의 배경이 제거되었으니 프레젠테이션 제작을 계속할 수 있어요.
투명 색상 설정은 단색 흰색 배경에서만 작동합니다
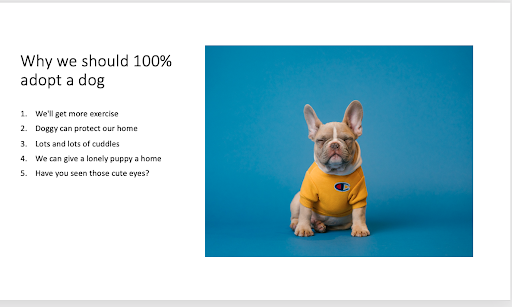
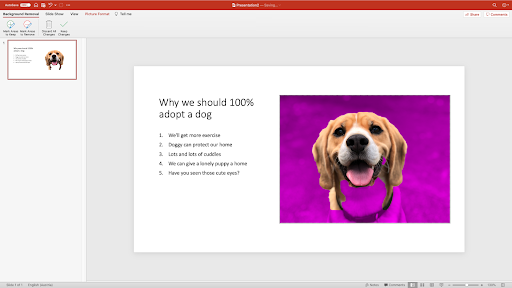
이 기능을 꽤 많이 사용해 봤는데, 솔직히 말해 그림자가 전혀 없는 스튜디오에서 촬영한 완벽한 흰색 배경에서만 제대로 작동합니다. 파란색 배경으로 시도했을 때는 결과가 이렇게 나왔습니다.
투명 색상 설정 효과를 사용하기 전
투명 색상 설정 효과를 적용한 후
보시다시피 이 도구는 배경의 일부만 여기저기 흩어진 형태로 제거했어요. 솔직히 말해, 저희가 보기엔 그다지 전문적으로 보이지는 않네요.
따라서 배경이 흰색이 아니거나 조금 더 복잡하다면, 대신 다음 옵션을 꼭 시도해 보세요.
PowerPoint에서 이미지 배경을 제거하는 방법: 배경 제거 도구
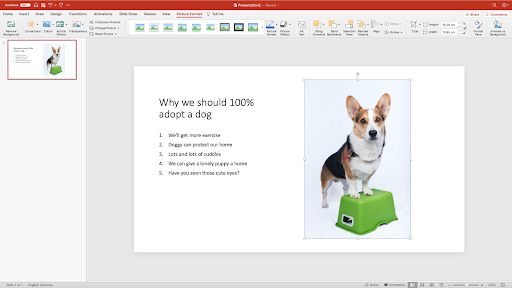
두 번째 방법은 더 안정적인 방법인 PowerPoint의 배경 제거 도구를 사용하는 것입니다. 배경을 제거하기가 조금 더 복잡한 사진에 특히 유용해요. 예를 들어 배경에 그림자, 나무 또는 해변 같은 요소가 있는 경우입니다.
직접 찍은 사진이 없어도 걱정하지 마세요. Unsplash에서 이 방법을 시도해 볼 수 있는 멋진 로열티 프리 사진을 찾을 수 있습니다.
다음 작업을 진행하세요:
-
사진을 클릭해 선택하세요.
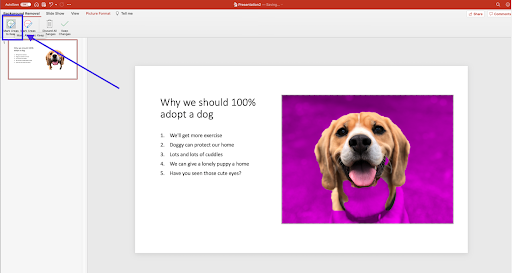
이제 PowerPoint 상단 바에서 > 그림 서식 으로 이동하세요.
-
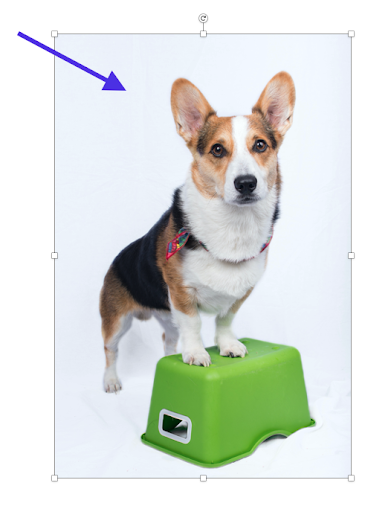
배경 제거를 선택하세요. 그러면 PowerPoint가 사진에서 배경이라고 판단한 부분을 선택/강조 표시합니다.
-
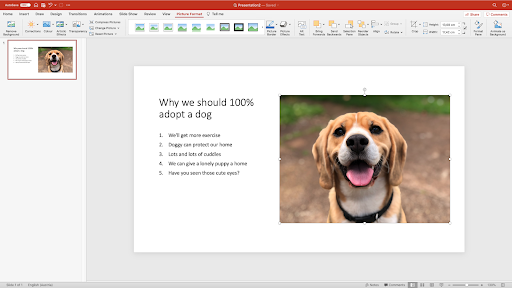
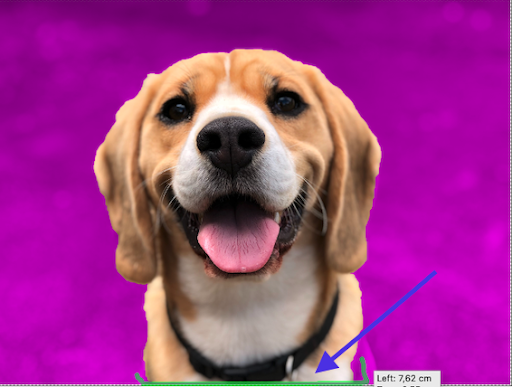
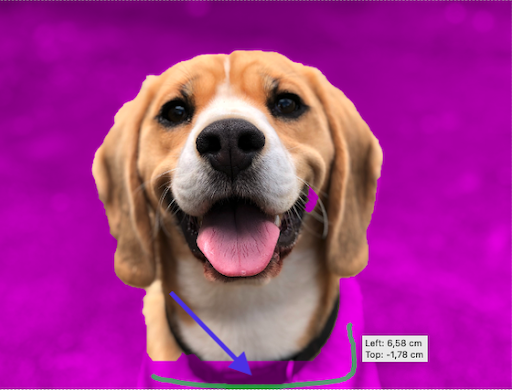
이제 사진이 이렇게 보일 거예요. 보라색 영역은 제거될 배경을 나타냅니다. 여기서 볼 수 있듯이 강아지의 대부분을 배경으로 잡았지만 목 부분은 놓쳤습니다. 따라서 다음 단계에서는 배경과 함께 제거되지 않고 ‘유지’할 부분을 조정해 보겠습니다.
-
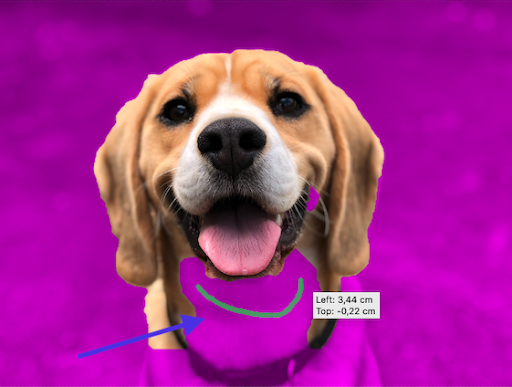
메뉴 왼쪽 모서리에서 > 보관할 영역 표시를 선택하세요. 이제 배경과 함께 제거되지 않고 ‘유지’할 영역을 선택할 수 있습니다. 머리카락 같은 부분은 유지하고 싶어도 가끔 제거될 수 있습니다.
더 넓은 영역을 선택하려면 클릭한 채로 드래그하거나, 사진 위를 클릭하거나 선을 그리면 PowerPoint가 다음과 같이 해당 부분을 강조 표시합니다.
7. 마음에 들면 > 변경 사항 유지를 클릭하세요.
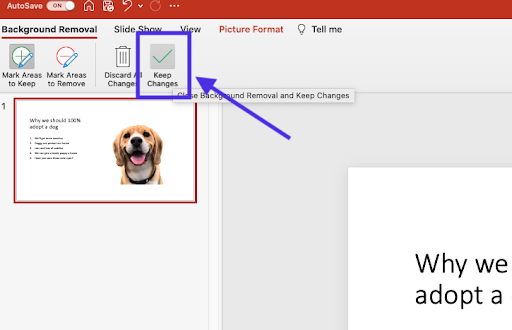
짜잔! 이제 배경이 없는 오려낸 사진이 완성됩니다.
이 단계를 따라도 제거하려는 배경 영역이 모두 지워지지 않았다면 > 제거할 영역 표시 를 선택하세요. 여기에서 가장자리를 세밀하게 다듬을 수 있습니다.
PowerPoint에서 이미지 배경 제거 — 언제 잘 작동하지 않을까요?
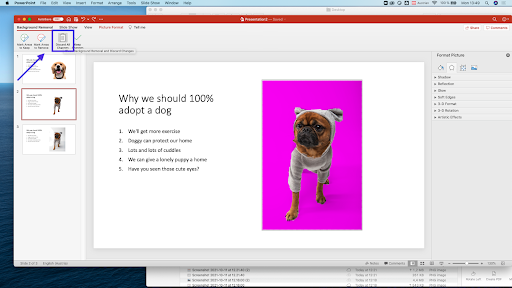
PowerPoint는 대부분의 경우 훌륭하게 작동하지만, 특히 잘 작동하지 않는 경우가 하나 있습니다. 바로 배경색과 주요 피사체(예: 개체나 사람)의 색상이 너무 비슷할 때인데요. 이 경우 배경을 제거하기가 조금 더 어려울 수 있습니다. 특히 흰색 배경과 흰색 개체의 경우 더욱 그렇습니다.
그라데이션이 있거나 머리카락, 깃털처럼 아주 작은 디테일이 있는 경우도 마찬가지입니다. 이는 PowerPoint에 통합된 두 가지 도구인 투명한 색 설정 과 배경 제거모두에 해당됩니다.
저희가 시도해 본 좋은 예시를 소개할게요.

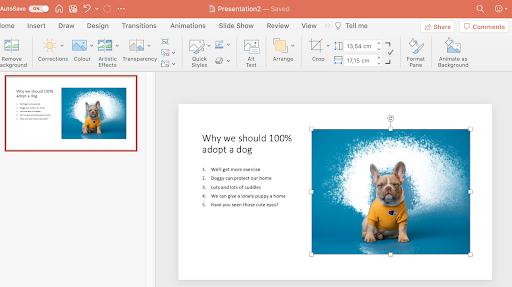
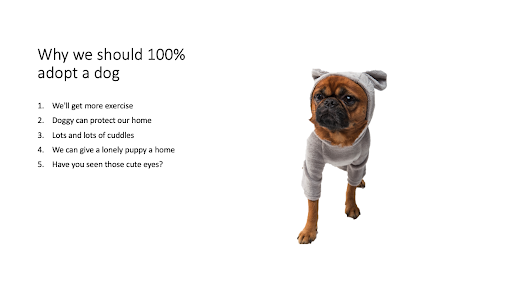
이 작은 강아지의 의상은 오프화이트 색상이고, 배경도 회색 그림자가 있는 흰색입니다. 두 가지 옵션을 모두 시도해 봤지만, 결과가 그다지 만족스럽지는 않았습니다.
투명 색상 설정 도구:이 도구는 실제로 전혀 작동하지 않았습니다. 이미지 배경의 한 부분만 인식해서 결과가 매우 지저분해졌습니다.
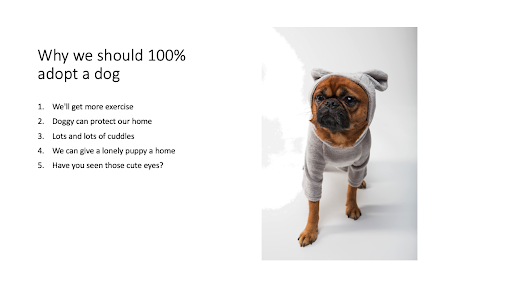
배경 제거 도구: 꽤 잘 작동했지만, 가장자리를 어느 정도 자연스럽게 다듬기 위해 꽤 많은 시행착오를 겪어야 했고, 보시다시피 아직 완벽하지는 않습니다.
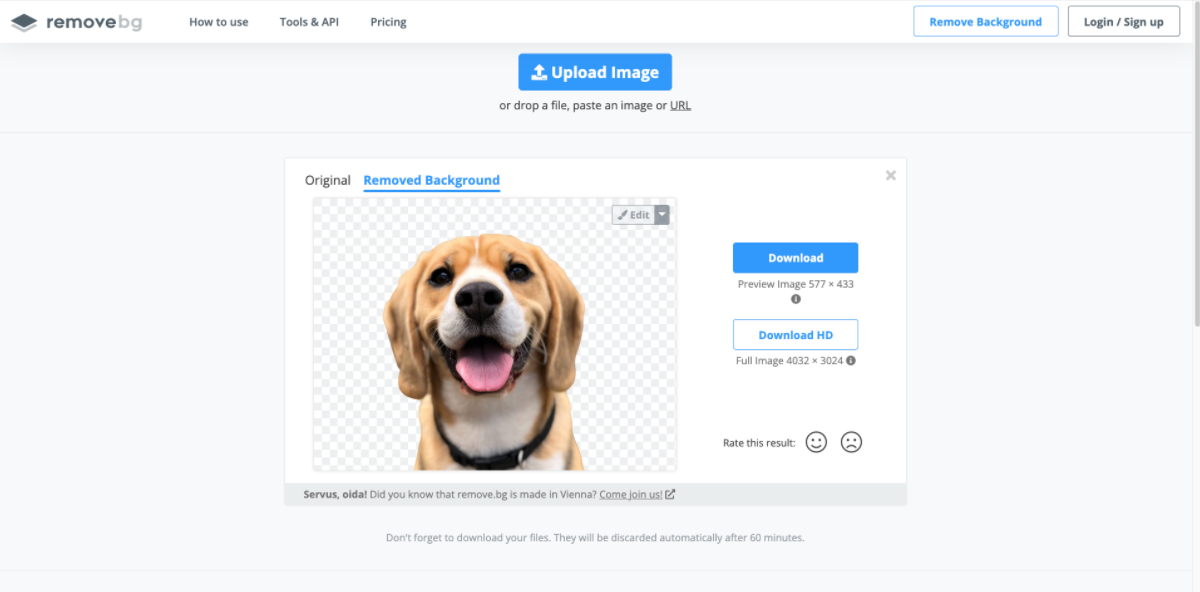
온라인에서 사진의 흰색 배경을 제거하고 PowerPoint에 업로드하는 방법
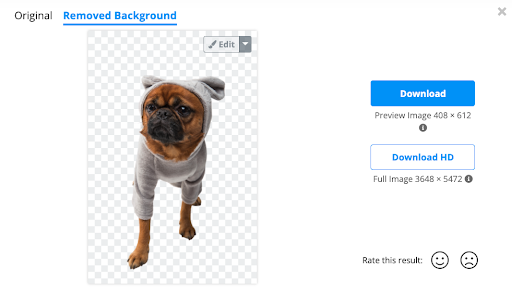
온라인 도구인 remove.bg 도 이번 이미지에 사용해 봤는데, 몇 초 만에 배경이 제거되었습니다. 이것저것 헤맬 필요 없이 AI가 어려운 작업을 대신해 줍니다.
간단히 말해:
remove.bg.로 이동합니다.
몇 초간 기다립니다.
다운로드를 클릭합니다.
추가하려는 PowerPoint 슬라이드로 사진을 드래그 앤 드롭합니다. 또는 > 삽입 > 그림 > 파일에서 그림 으로 이동한 다음 방금 다운로드한 이미지를 선택해도 됩니다.
PowerPoint에서 이미지 배경 제거 실행 취소하기
변경 사항이 마음에 들지 않나요? 배경 제거 도구로 적용한 변경 사항도 쉽게 되돌릴 수 있어요.
PowerPoint에서 투명한 색 설정 도구로 배경 제거를 되돌리는 방법
투명 색상 설정 도구의 결과가 마음에 들지 않는다면 편집 > 투명 색상 설정 실행 취소 로 이동해 작업을 간단히 되돌릴 수 있습니다. 키보드 단축키 CTRL + Z를 사용하거나 Mac에서는 Command Z를 사용할 수도 있습니다.
PowerPoint의 배경 제거 도구로 배경 제거를 실행 취소하는 방법
배경 제거 도구를 사용했다면 다음으로 이동하세요:
1. 그림 서식 > 배경 제거를 선택합니다.
2. 선택 > 모든 변경 사항 취소를 선택합니다.
이제 모든 것이 마지막으로 두셨던 상태로 돌아왔을 거예요.
PowerPoint OneDrive에서 작업할 때 온라인으로 배경을 제거하는 방법
OneDrive로 작업 중이라면 PowerPoint에는 통합 배경 제거 도구가 없다는 것을 알 수 있습니다. 하지만 원하는 결과를 몇 초 만에 얻을 수 있는 훌륭한 온라인 대안을 제공해 드립니다.
사진을 PowerPoint에 업로드하는 대신, 먼저 remove.bg로 이동하세요.
그런 다음 이미지를 끌어다 놓기만 하면 업로드할 수 있어요.
몇 초 후 사진의 배경이 사라집니다.
4. 이제 > 다운로드를 클릭하세요.
5. 이미지가 컴퓨터에 다운로드되면 PowerPoint에 업로드하기만 하면 됩니다. 그러면 배경이 제거된 사진이 완성됩니다.
remove.bg는 사진의 배경을 빠르고 쉽게 제거할 수 있는 온라인 도구일 뿐만 아니라, AI 기술을 활용해 PowerPoint에 내장된 도구보다 훨씬 더 정밀하게 배경을 제거해 줍니다. OneDrive PowerPoint 또는 데스크톱 버전과 함께 자유롭게 사용해 보세요.
PowerPoint 프레젠테이션 꿀팁 - PowerPoint에서 배경을 제거한 후 해야 할 일
이제 PowerPoint에서 이미지 배경을 제거했으니, 다음엔 무엇을 할 수 있을지 궁금하실 거예요. 오래 기억에 남는 프레젠테이션을 완성할 수 있도록, 다음 단계에서 활용해 볼 만한 편집 방법과 창의적인 아이디어를 소개합니다.
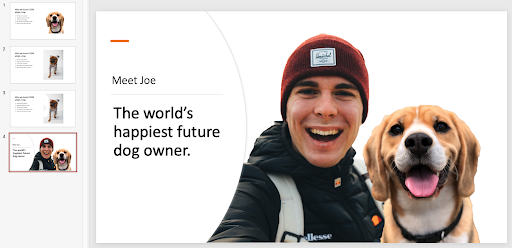
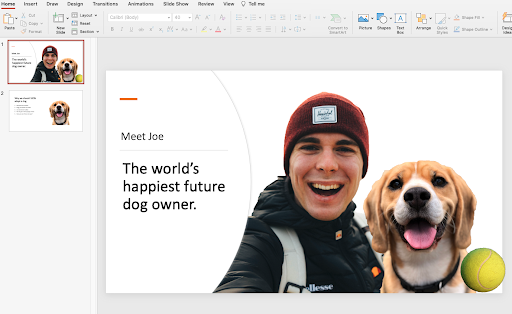
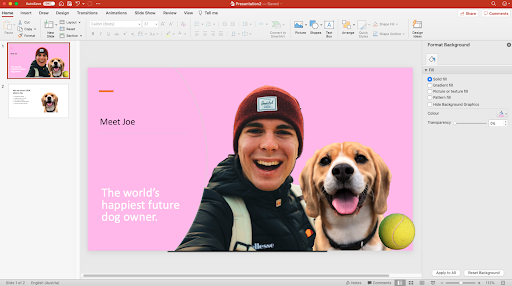
여러 사진을 합치고 겹쳐 하나의 이미지를 만들어보세요.
이 예시에서는 Joe와 그의 새 반려견, 테니스공 사진을 레이어로 겹쳤습니다.
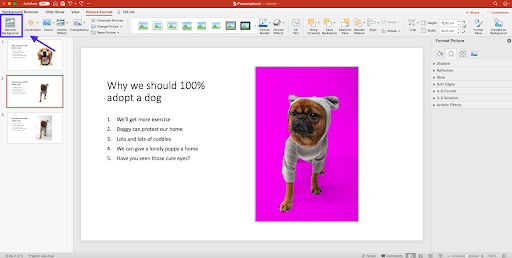
2. 다음으로, 슬라이드 > 배경 서식 > 삽입을 선택해 배경을 바꿀 수 있습니다. 여기에서 원하는 배경을 업로드하세요.
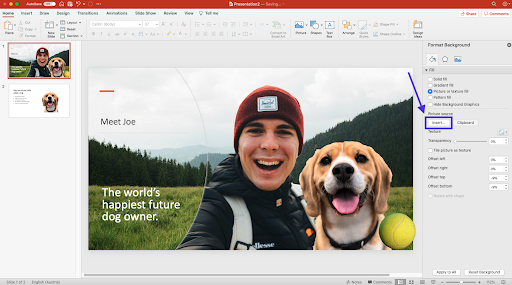
3. 이미지를 선택해 사진을 세부적으로 조정할 수도 있습니다. 그런 다음 > 그림 서식 > 그림 색 으로 이동해 대비와 색 온도 등을 조정하면서 이미지 스타일이 서로 잘 어울리도록 맞춰 보세요.
4. 좀 더 그래픽적인 배경을 원한다면 슬라이드를 다시 선택하세요. 그런 다음 > 배경 서식 으로 이동해 > 단색 채우기를 선택하세요.
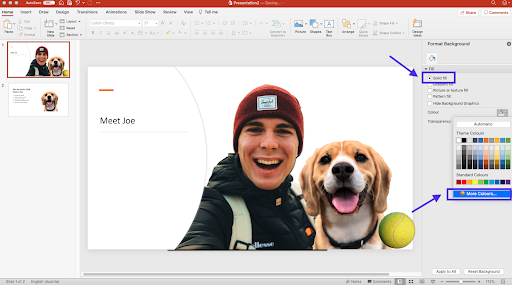
이제 색상에서 배경으로 사용할 색상을 원하는 대로 선택할 수 있습니다.
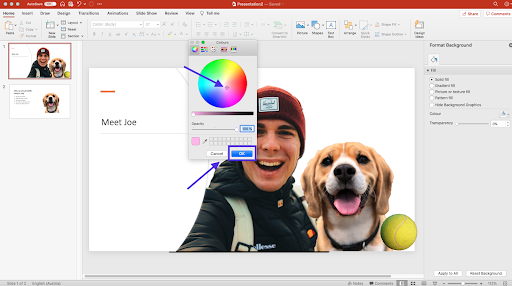
저희는 분홍색 면 소재로 된 것으로 고르기로 했어요.
5. 슬라이드의 이미지를 배경, 전경 또는 그 사이에 오도록 재배치할 수도 있습니다.
선택지는 정말 무궁무진합니다. 다양한 배경에 이미지를 조합하고, 아이콘을 추가하고, 글꼴과 글머리 기호를 바꾸는 등 하루 종일 마음껏 시도해 볼 수 있죠… 할 수 있는 일이 끝이 없습니다.
매력적인 콘텐츠를 만들고 싶을 때는 배경 제거 기능을 모든 워크플로에 통합해 두면 아주 유용합니다. remove.bg, Google Slides, Photoshop, GIMP, Adobe Illustrator 같은 도구를 사용하면 배경을 간편하게 제거할 수 있어요. 방법이 궁금하신가요? 자세한 내용은 이미지 배경을 삭제하는 방법 게시물에서 확인해 보세요.
댓글
https://www.remove.bg/a/remove-background-from-image-powerpoint
nice! thanks
Thanks for sharing the blogs with us.