Your number one trick to staying on top of your e-commerce game: great product photos. And when you've got just seconds to capture your audience's attention, small details go a long way. Like, for example, adding a hint of shadow to an image.
Subtly retouching your shots can give your photos a more luxurious, high-quality look and feel. So if you've ever wondered how to add a shadow to product photos, here's a guide with Photoshop, Illustrator — and an intuitive, automatic, super quick option: Designify.
Table of contents
- Why adding a shadow to an image is smart marketing
- How to add product photo shadows — pre-production
- How to add shadows to your images post-production — with Designify
- How to add shadows in Photoshop
- How to add a shadow to images with Illustrator
- Cast a spotlight on what you’re selling — with product photo shadows
Why adding a shadow to an image is smart marketing
Think of the last item you bought off Amazon or Shopify — you likely picked it over the others because something about it just felt right. Right? That’s the power of a professional product photo. And with a simple detail like a shadow, your images look cleaner, more professional, and more realistic. (All details that convince your customers to hit ‘Buy’.)
Let's see it for ourselves with some examples from e-commerce product photography:
-
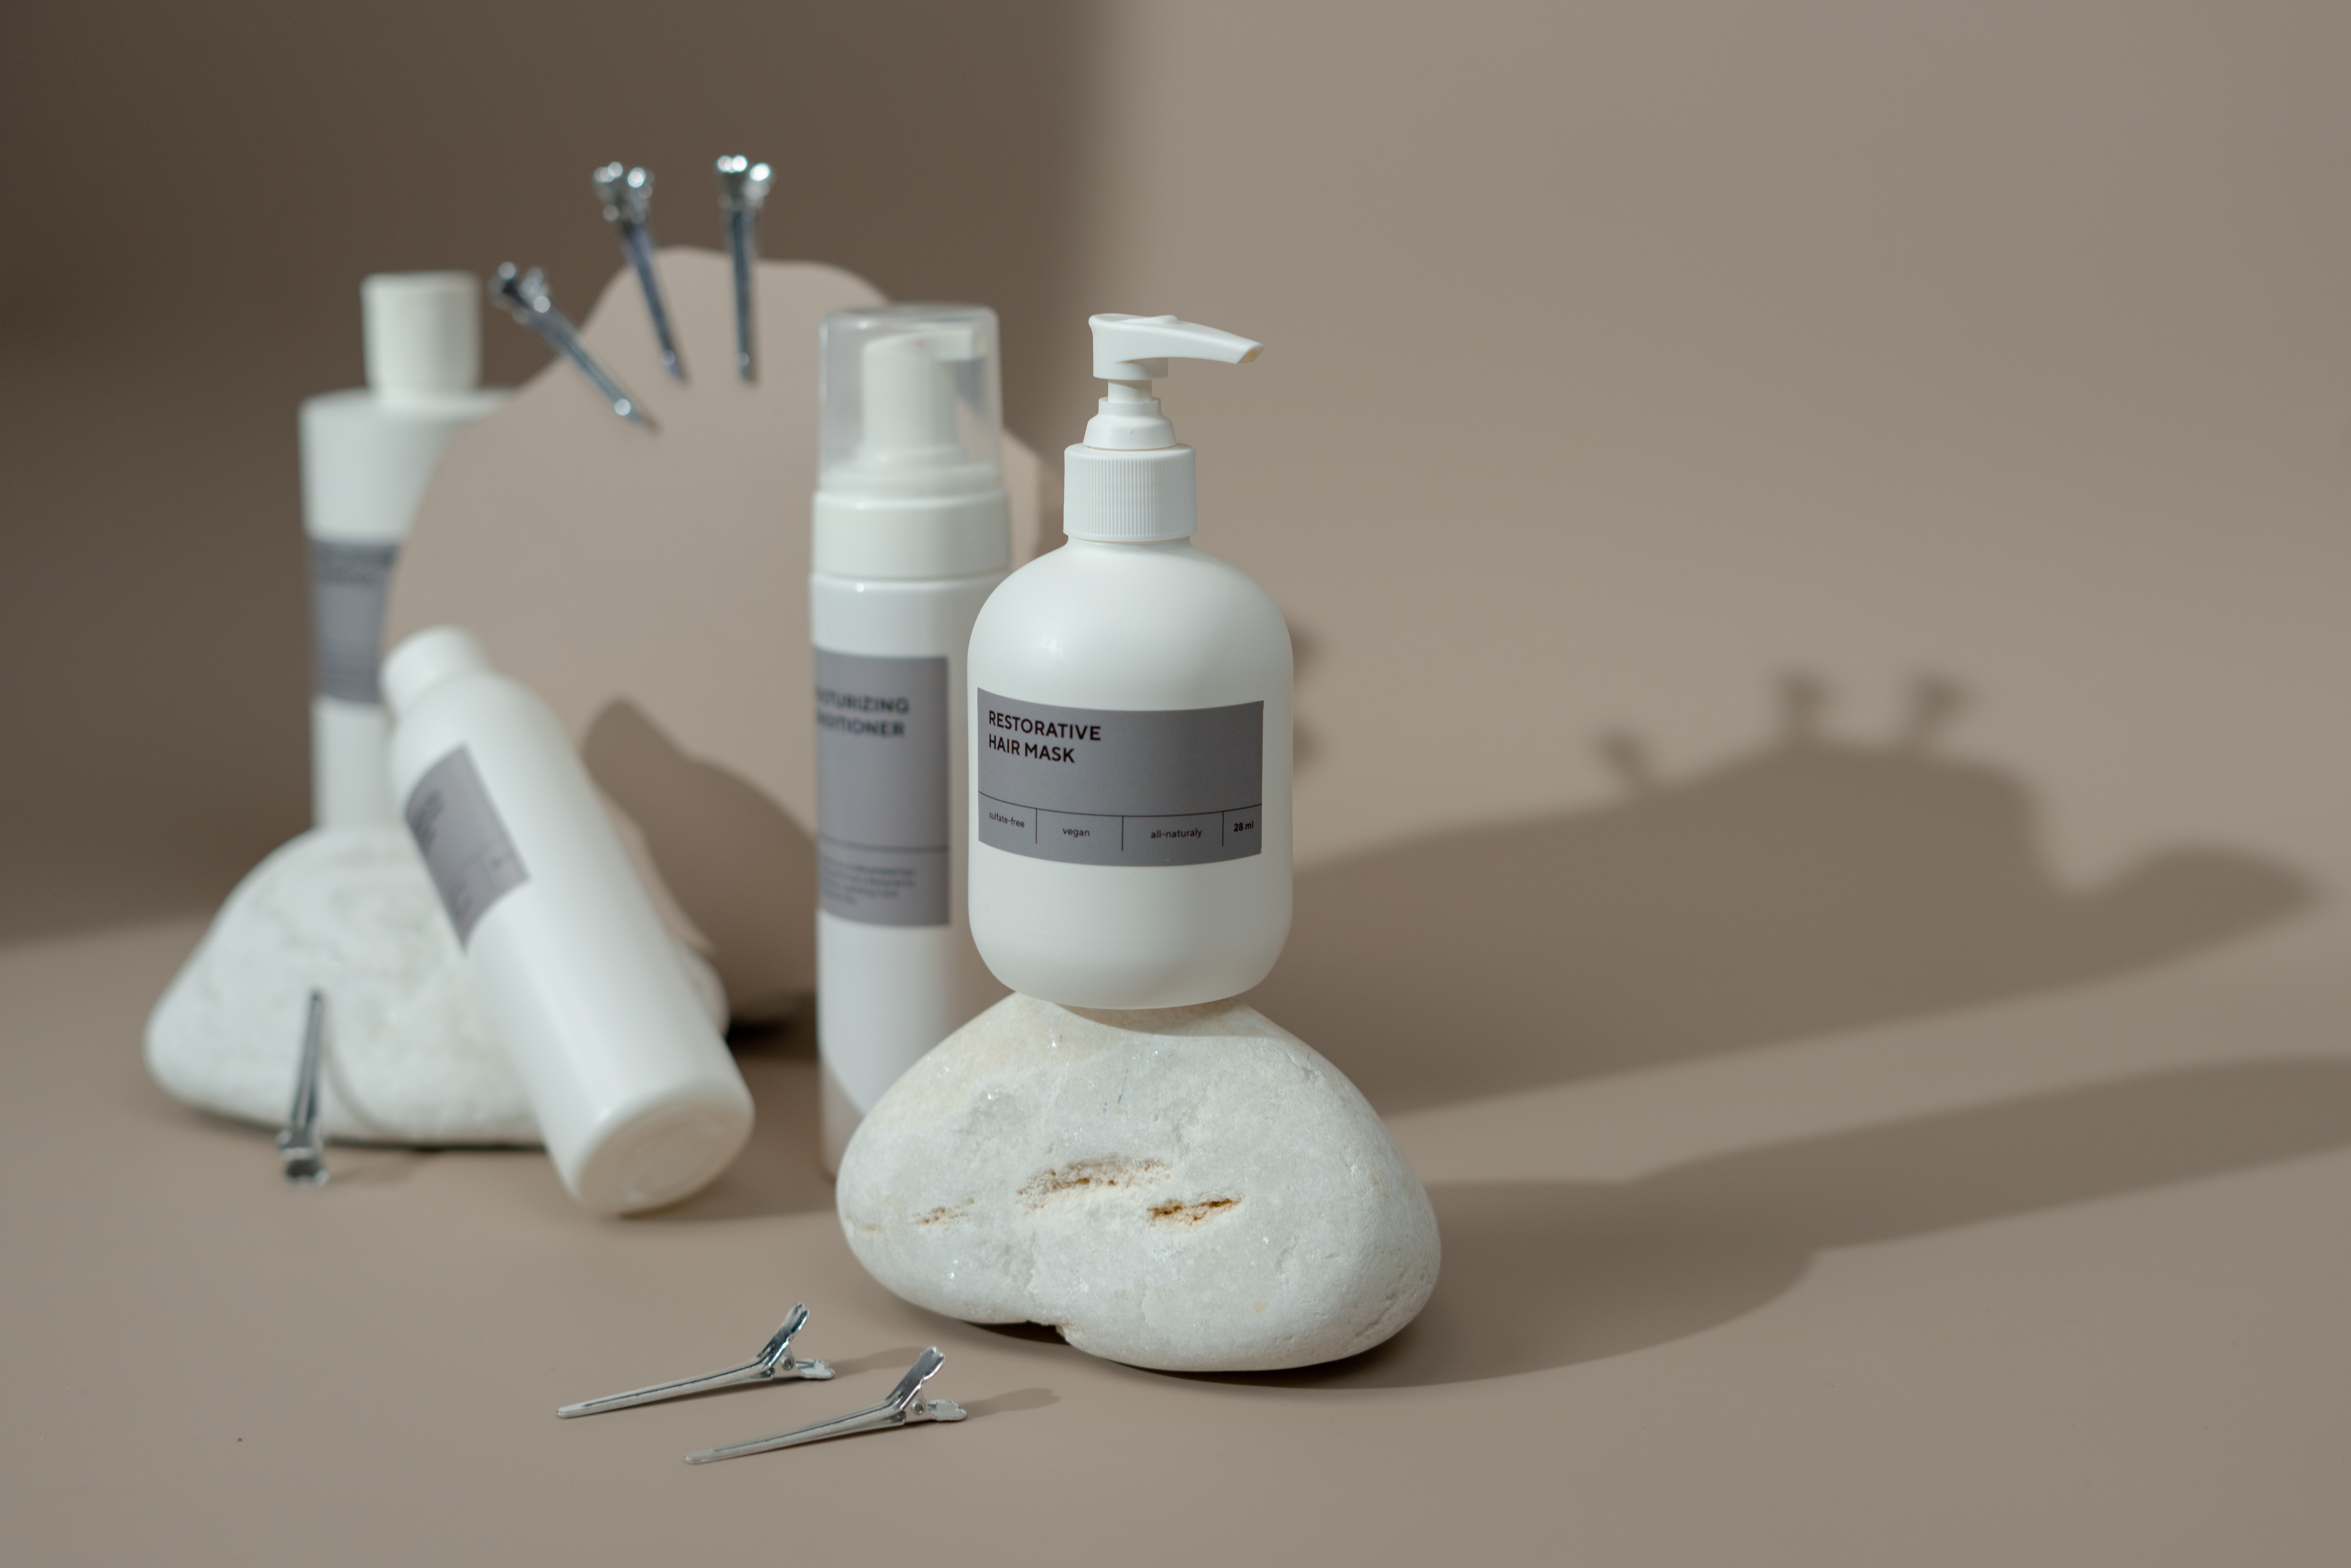
Natural shadows emerge when you photograph your products with lighting from one side:
-
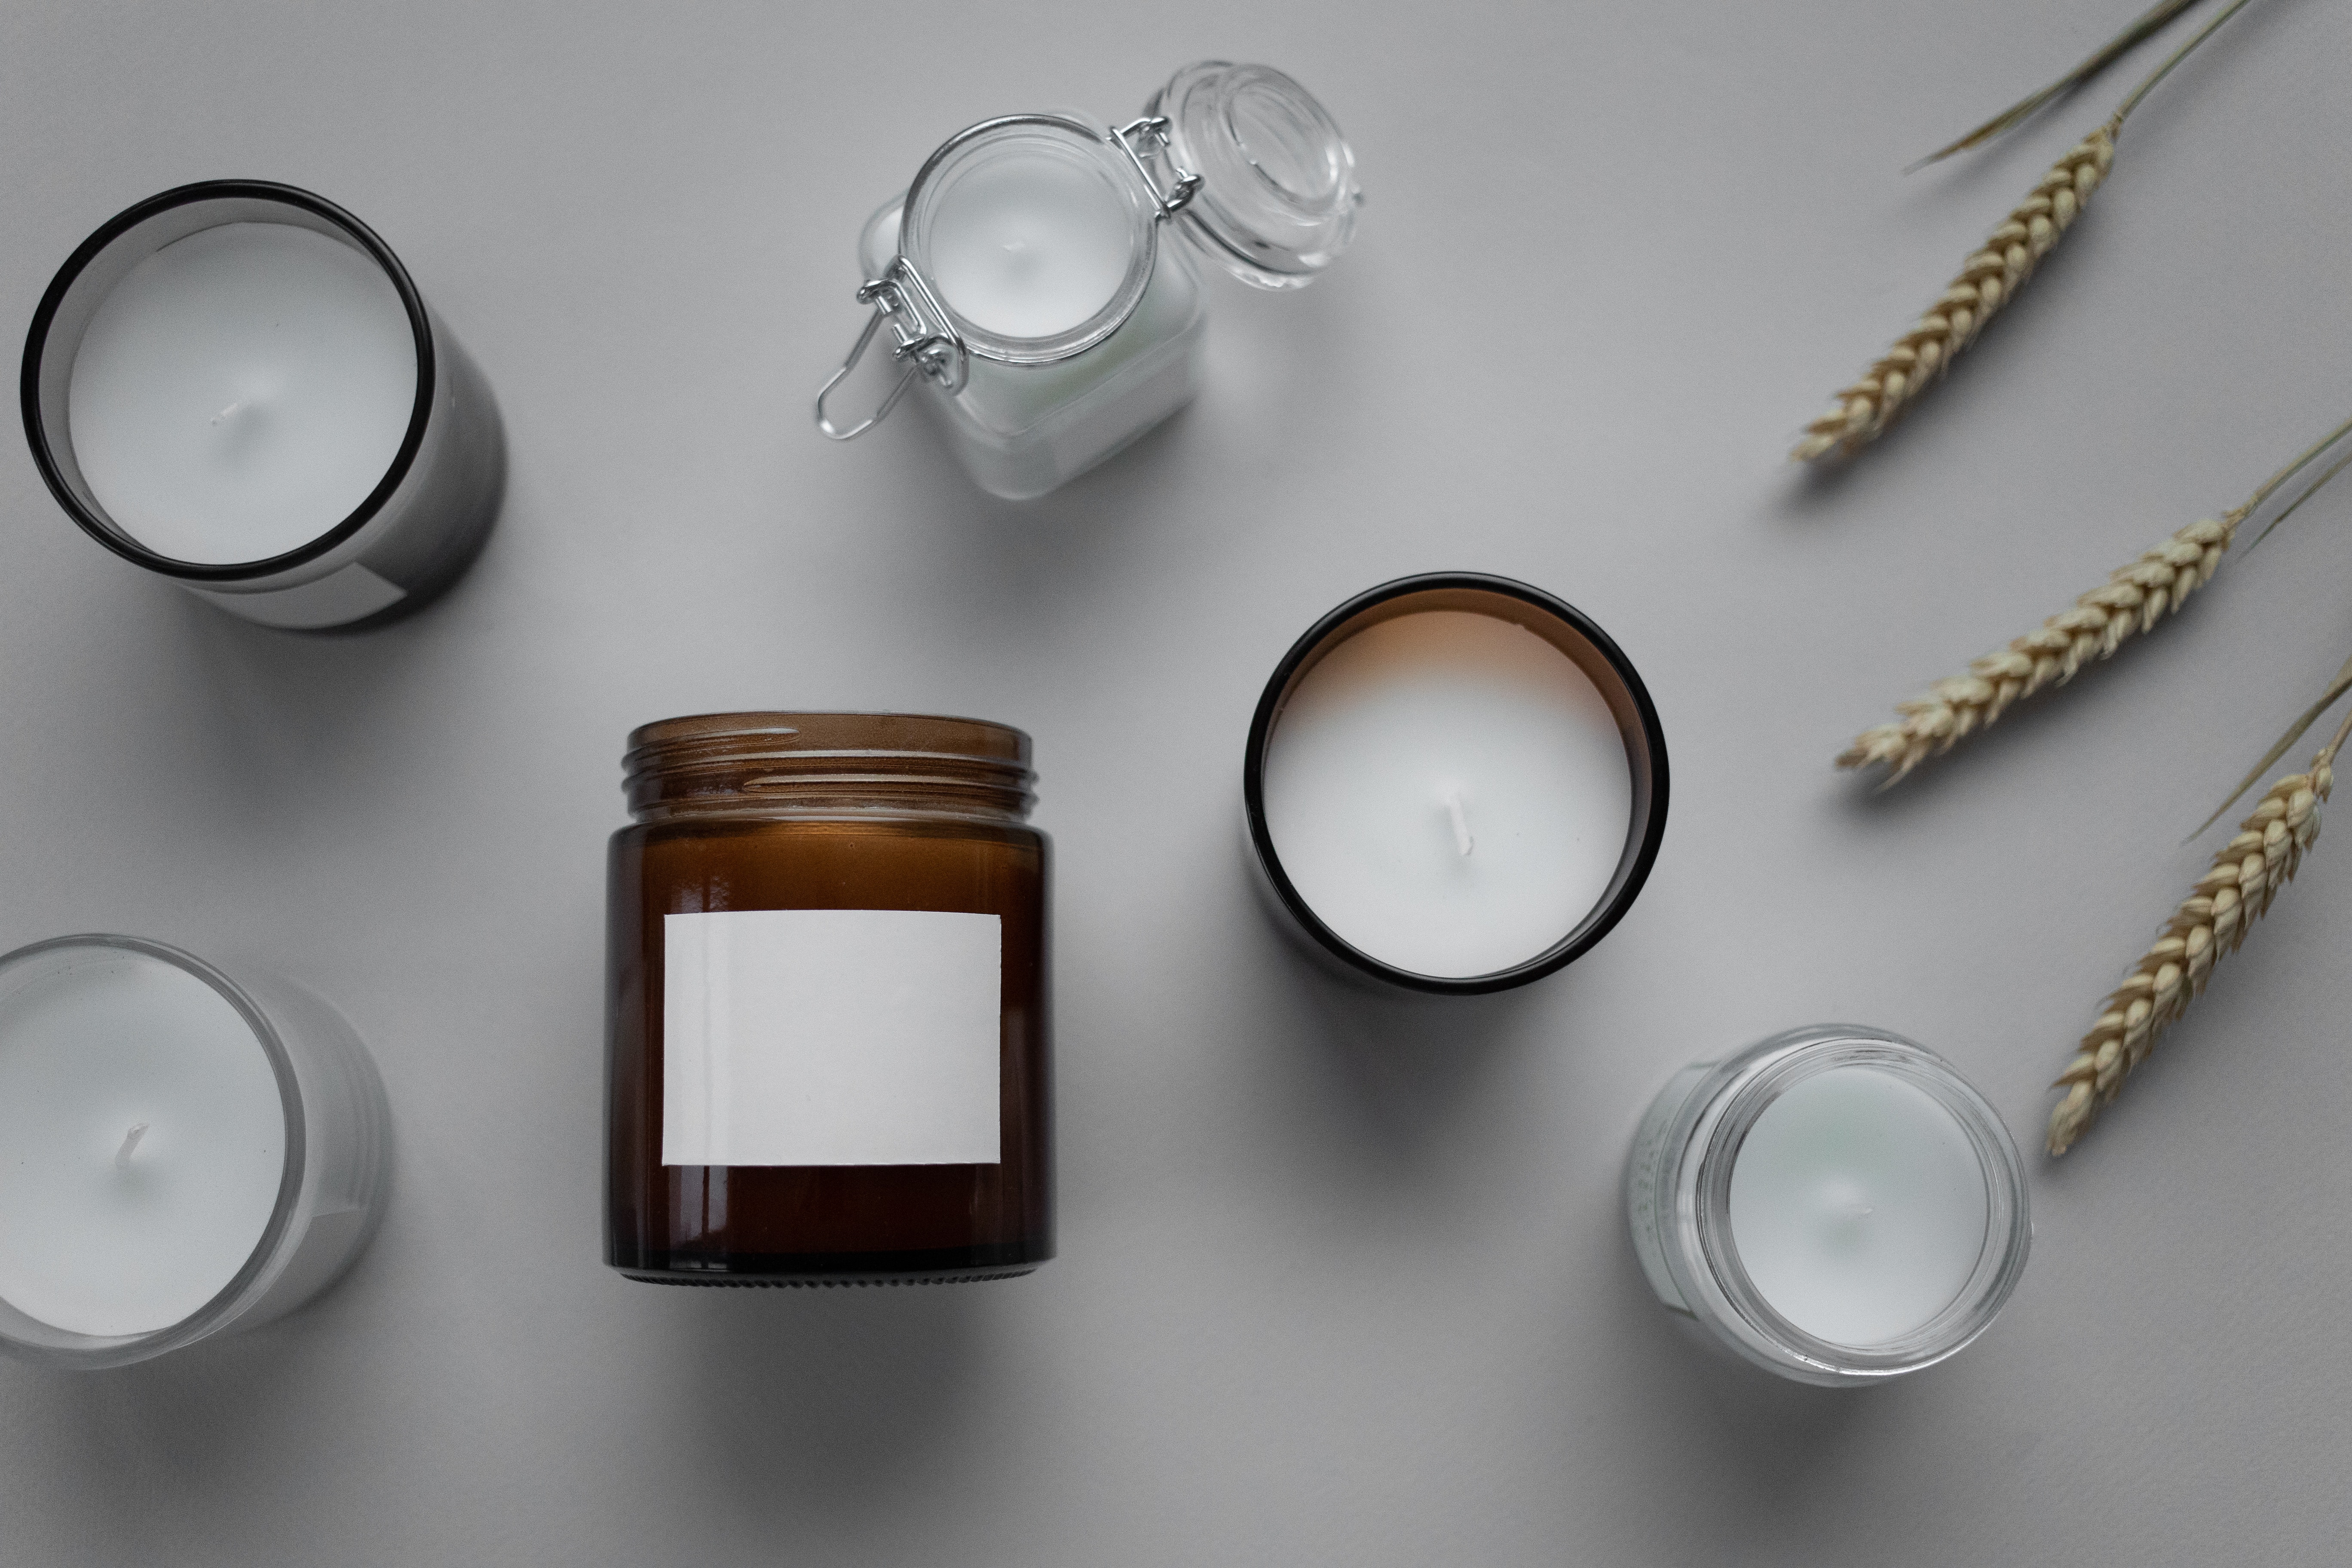
Drop shadows emerge when you photograph your products directly from above:
-
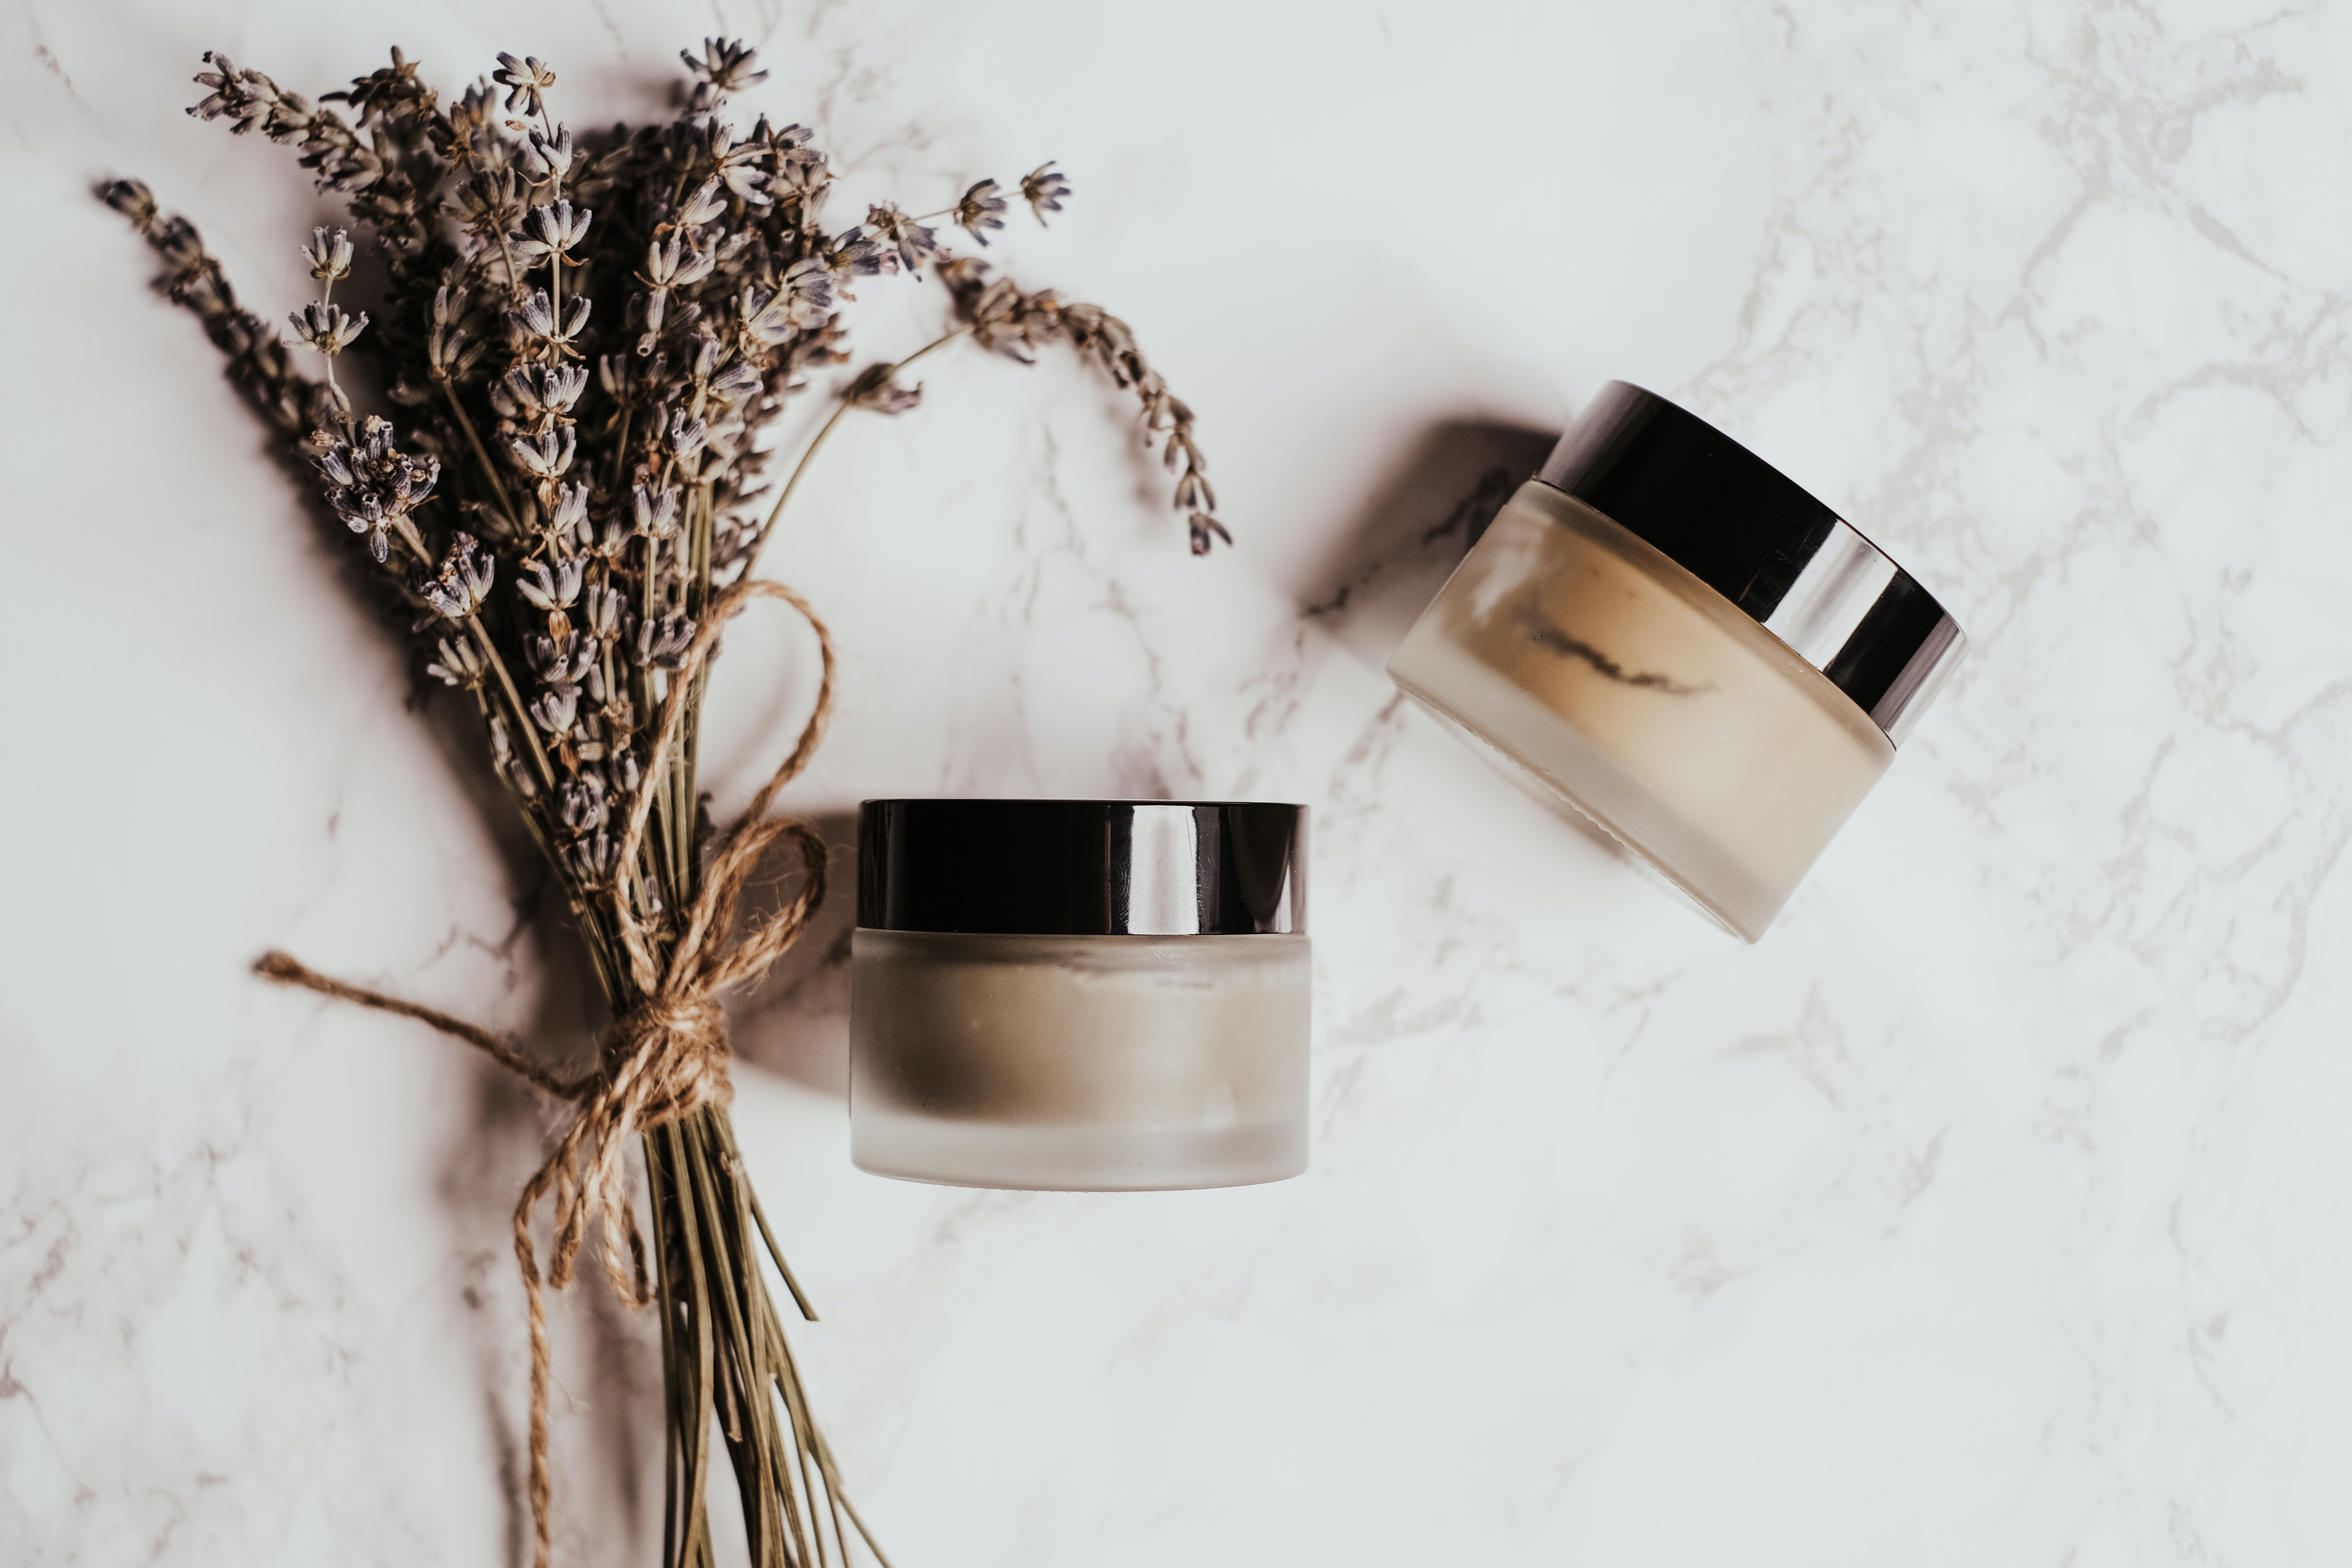
Reflection shadows emerge when you take a shot that makes your product look like it's on a mirror-like surface:
All of these different shadow types add a professional touch to your product photos — and make your customers more likely to make a purchase. But if you're wondering whether they make such a big difference in the first place, let’s see it in practice.
Here's an example with the standard white e-commerce background — only without a shadow:
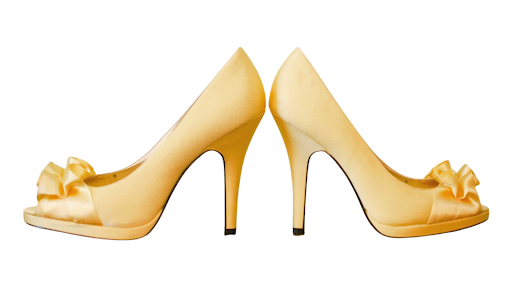
So while this is a gorgeous shot by itself, you also want to avoid taking product photos that look like they're floating. This can create a sense that something's 'off' about what you're selling. (And which makes your customers less likely to buy.)
On the other hand, with a shadow edited in, you create a more user-friendly e-commerce experience. Aka, it works with (not against) your customers' depth perception — i.e., how your product fits with its environment:
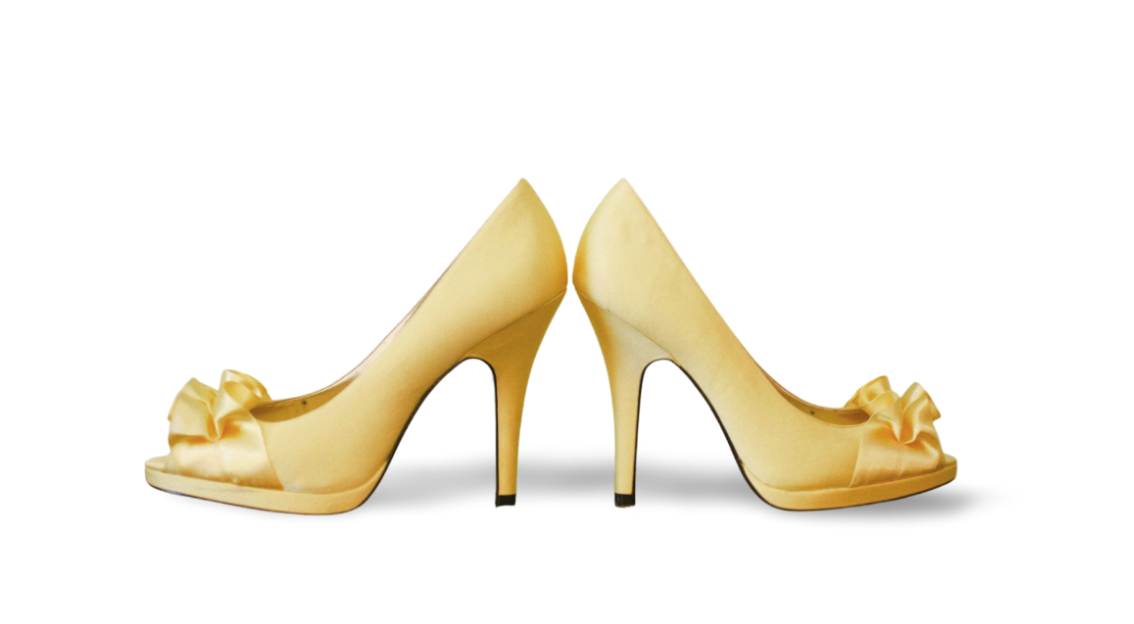
Even with a subtle detail like this, a shadow helps your product photos look sharper and more lifelike. Which means it's easier for a customer to visualize it in 3D — and even real life, once they hit 'Buy'.
So with all this said, let's figure out how to naturally add a shadow to your product photos while you're busy snapping them.
How to add product photo shadows — pre-production
If you're just getting started with your shoot, check out our ultimate guide to product photo editing: it covers some key points to help you nail your shots. Here are a couple of tips that can help you add shadows to your product photos 100% naturally:
Use a white (or plain) background
You might've noticed how most e-commerce photos have white, neutral, or solid backgrounds — these help your customers focus on your product front and center. (A background that’s too busy can end up distracting them instead.) Plus, with a hint of shadow against a plain background, it's one of the best ways to make your product stand out best.
So here's a simple trick to create a plain background manually: with a sweep or a sheet of thick paper. (Like in this example below.) You can attach it to a flat surface (like a wall) at 90 degrees to create an expansive plain background like this:
With this, your product photo shadows emerge naturally against the lighting — and add more depth and dimension to your images.
Soften shadows with your lighting
Product photo shadows emerge best when you have a consistent source of lighting — whether natural or artificial. The shadow that results usually depends on how you’ve angled your camera from the lighting. So in case you’re finding your shadows a bit too dramatic, you can make their effect more subtle with:
Lighting on either side of your product
Reflector cards or a white shoebox to bounce the light back
A softbox or baking paper shield over your lighting
With these tricks, you can soften your shadows so that they dominate less — letting your product shine through instead.
Use a consistent angle for your shots
Different angles create different shadows — sideways for natural shadows, directly overhead for drop shadows. Depending on what you're selling, you might find a particular angle a better fit. For example:
Natural shadows are popular choices for home decor and cosmetics.
Drop shadows work great for furniture, shoes, and electronics.
Reflection shadows are a great choice for luxury items like jewelry or sunglasses.
This isn’t a comprehensive list — we recommend playing around with different angles until you find one that fits your product best. Though in the end, no matter what you choose: consistency is key. Using a standard angle for your product photos helps them look more professional and helps you build your own brand 'look'.

Which, in turn, makes your products easier to recognize — and buy.
Now what if you've already taken a bunch of product photos but aren't happy with some detail — like the background or the angle of the shadow? Here are a couple of your options, post-production.
How to add shadows to your images post-production — with Designify
Here's your first super quick, automatic option — adjusting your product photo shadows with Designify. Here's an example to get you started:

If you've ever wondered how to remove the background of an image without getting rid of the shadows — keep reading. We're going to do just this with a little help from Designify, easy as 1-2-3:
1. Drag and drop (or upload) your product photo to Designify:

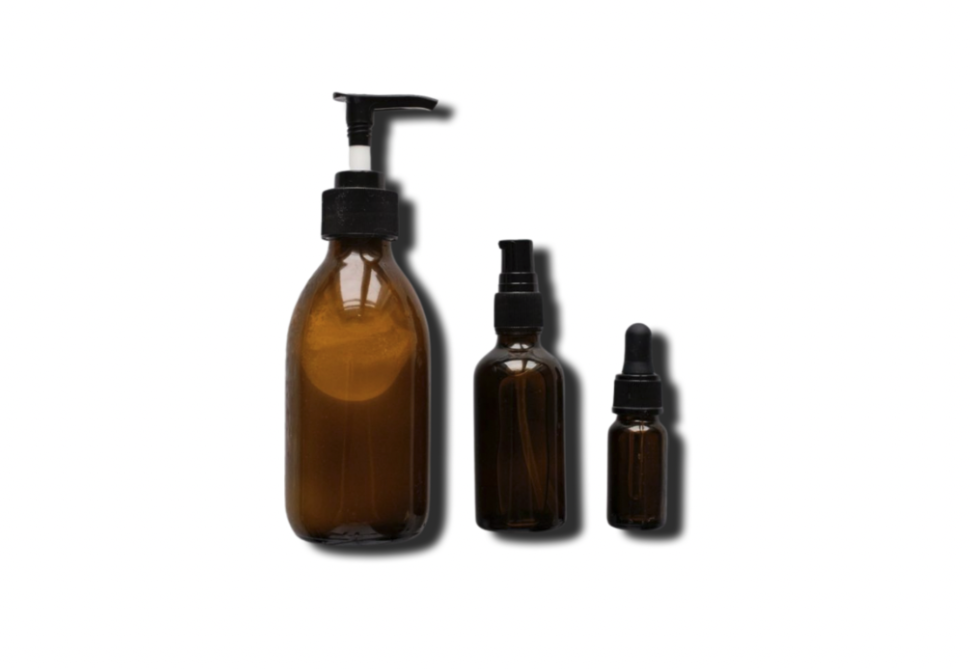
2. And tada! Designify removes your product photo background by default. Here's your new image with the standard white background most commonly used in e-commerce stores:

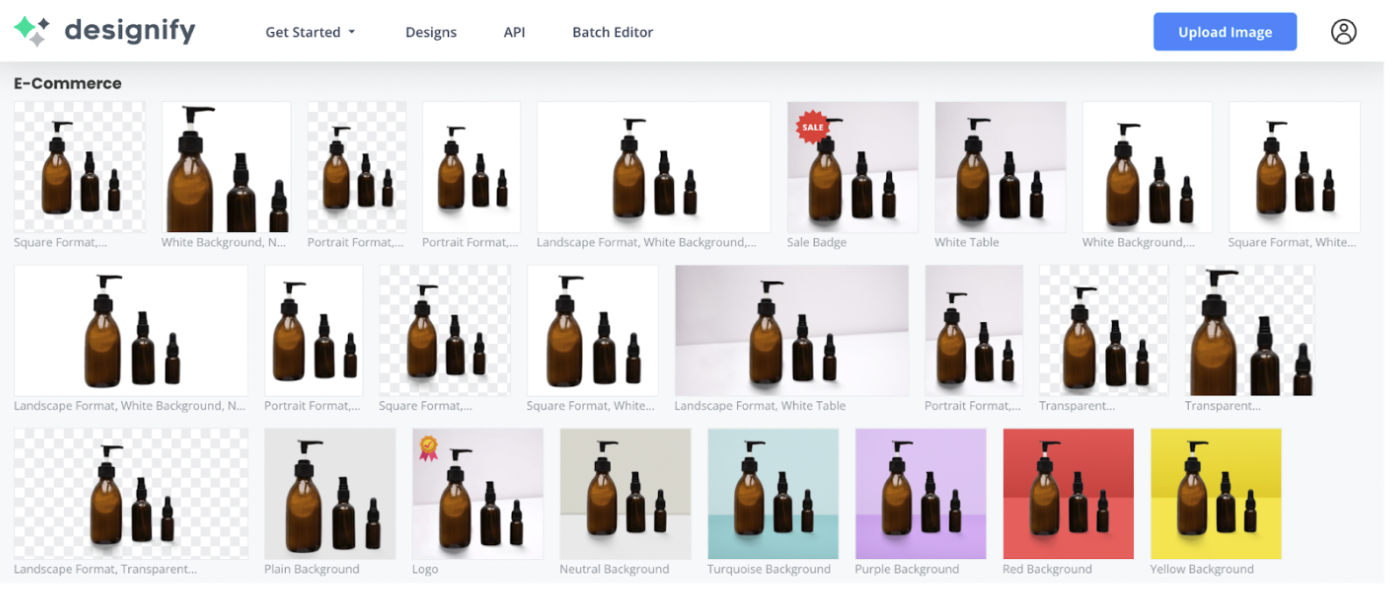
Now let’s check out Designify's range of e-commerce image backgrounds you can pick from — most come with a readymade shadow edited in:
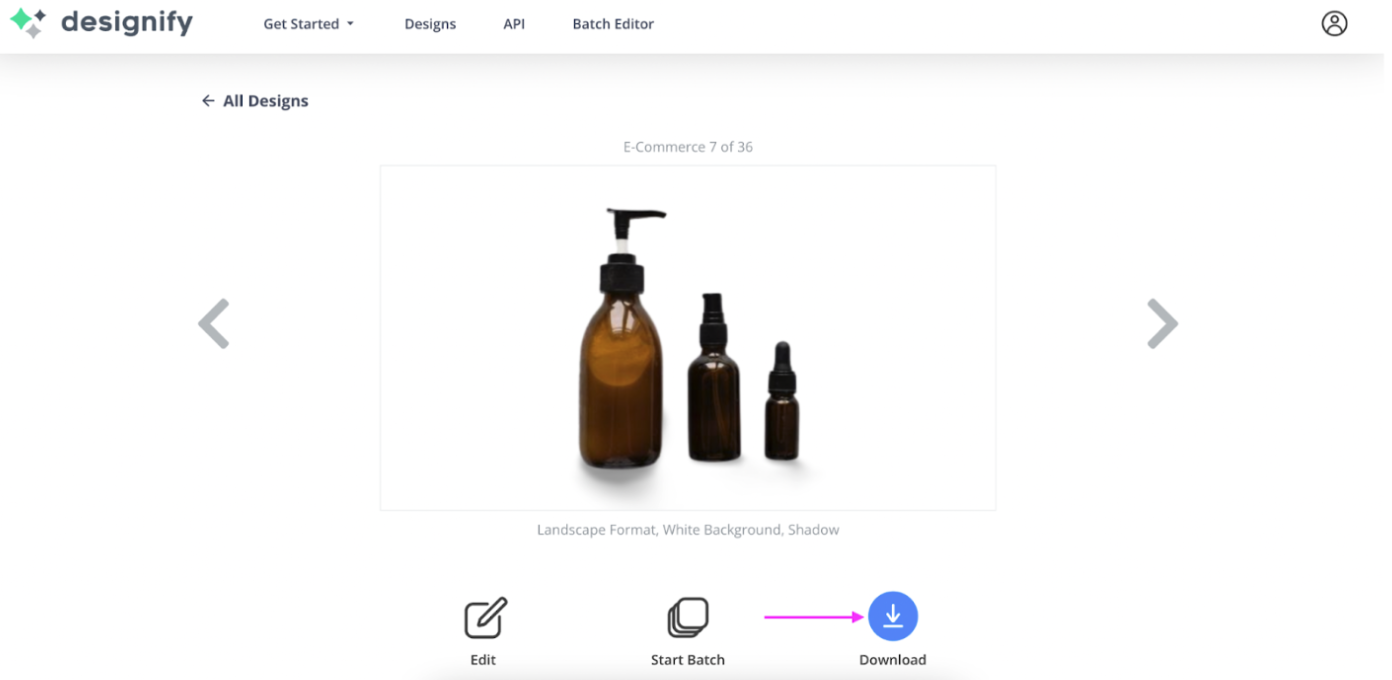
3. Here's an example of the > Landscape format, White Background, Shadow image format. If you’re happy with your new image, just hit the blue > Download button to save your new product photo as a PNG file to your device:
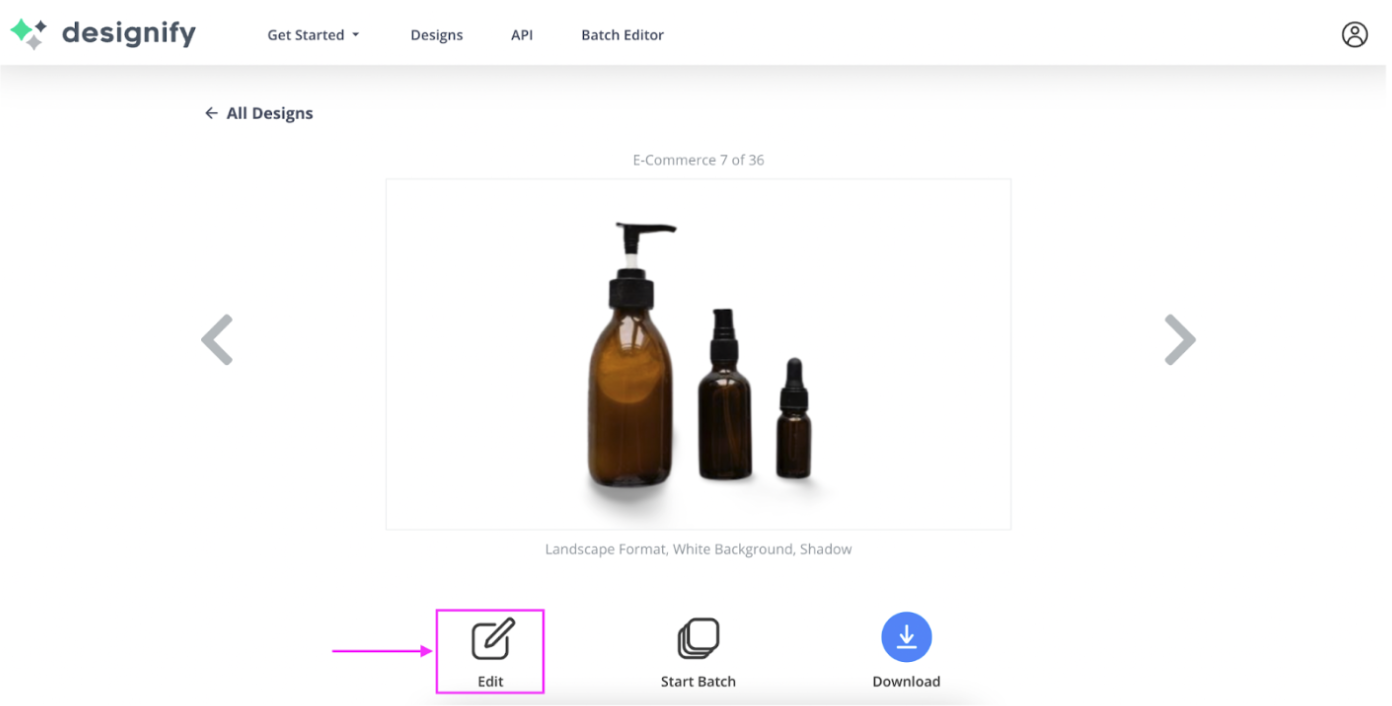
4. But if you want to play around with your new product photo a bit, let's go for > Edit and use Designify’s Smart Editor instead:
5. From > Elements on the right-hand side, click the > Pencil icon next to the image of the product to start editing:
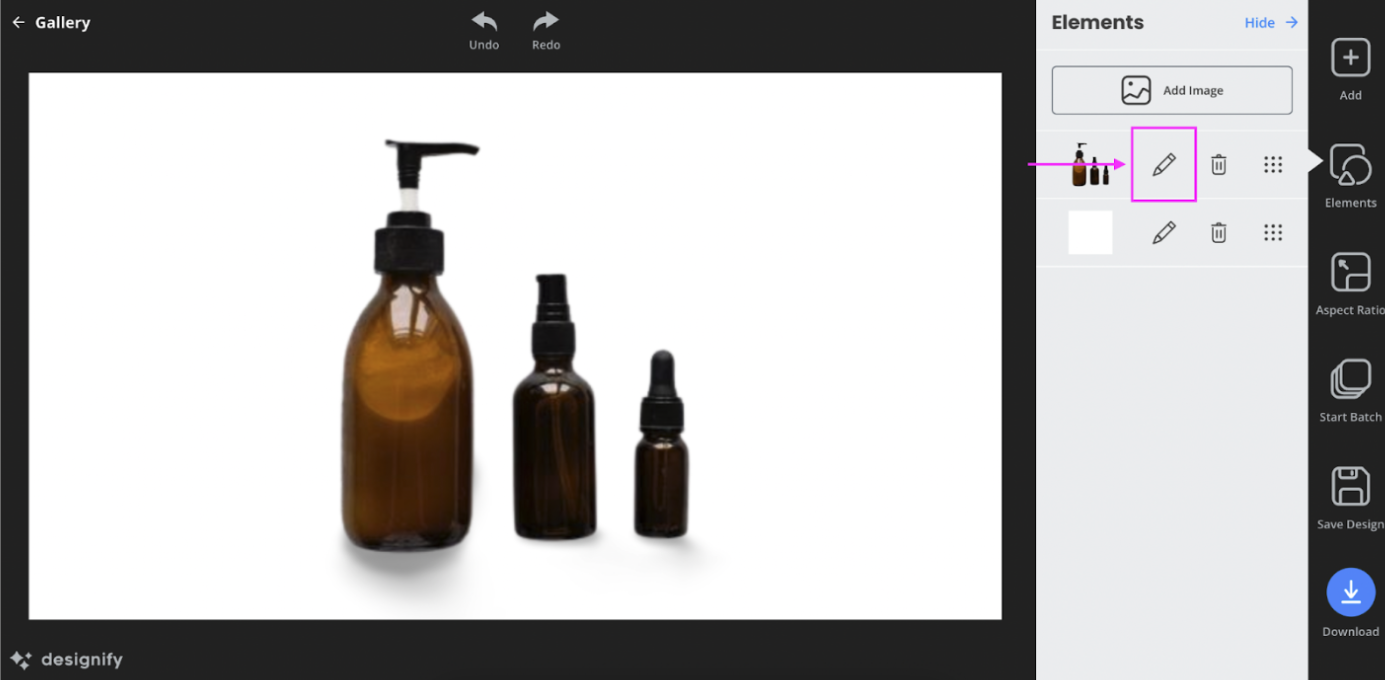
6. From > Shadow, for example, you can darken your product photo shadows by increasing the opacity:
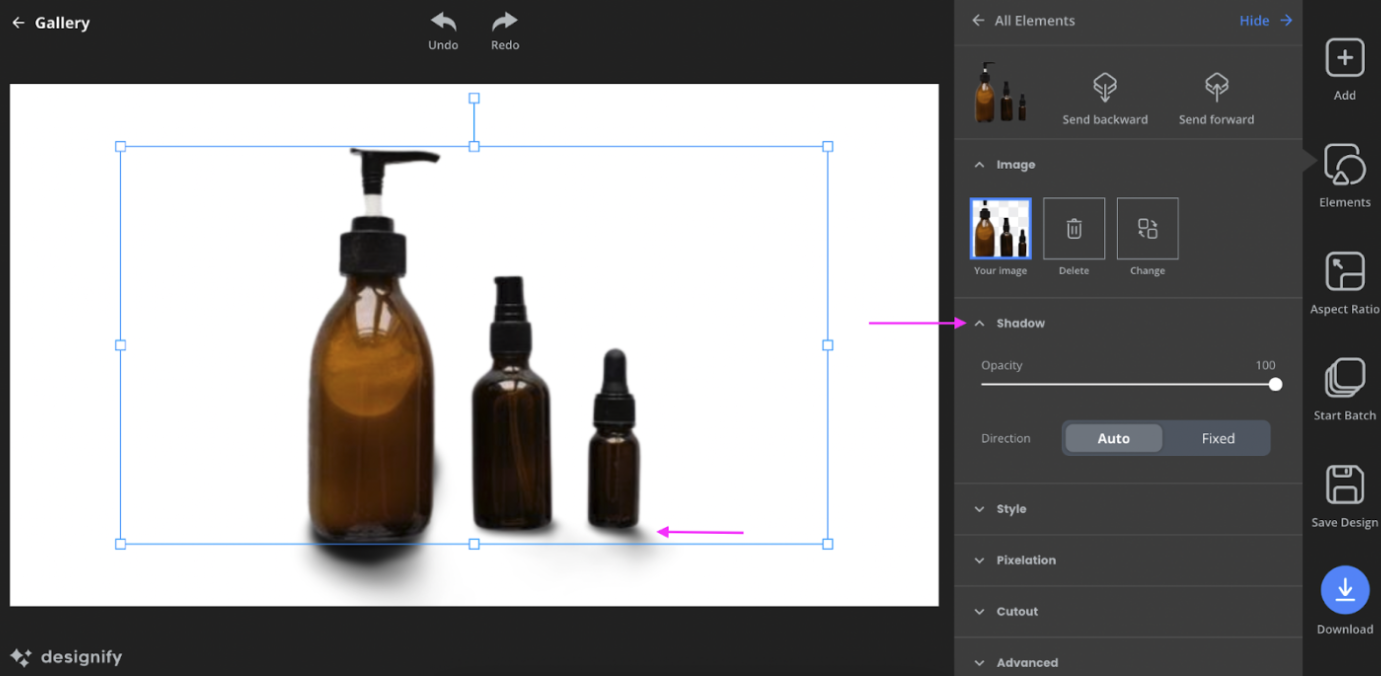
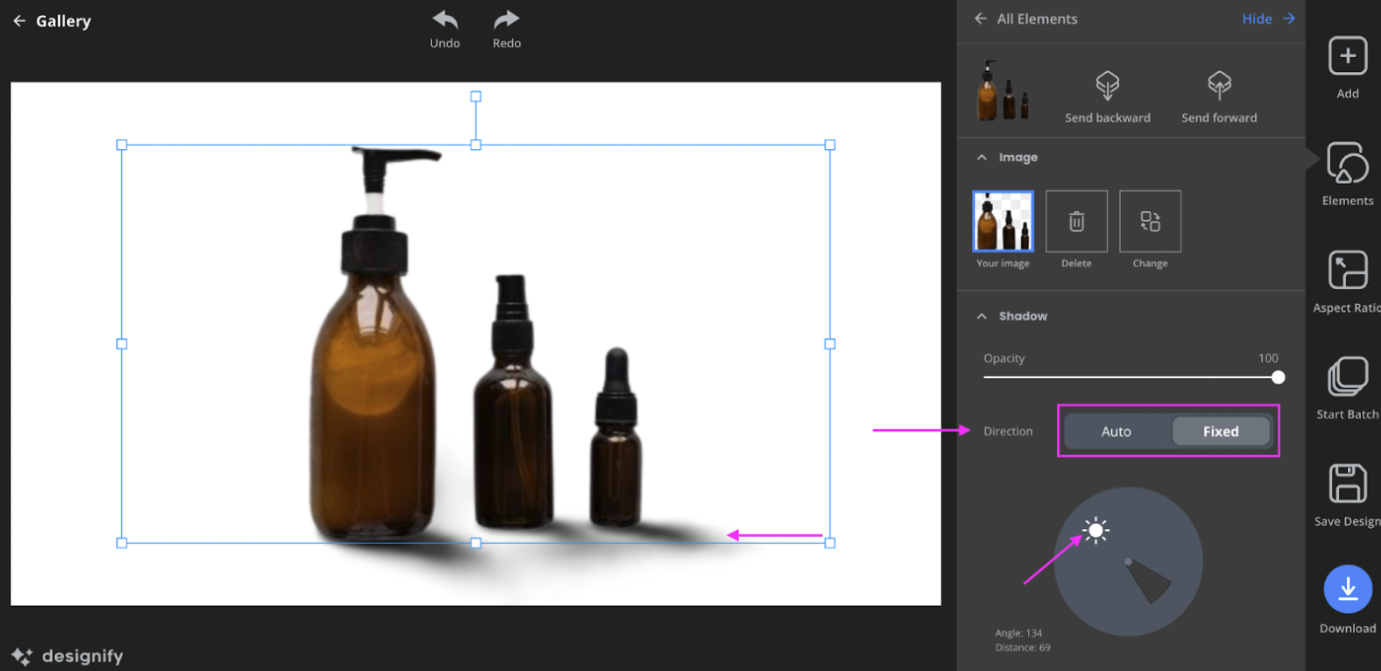
7. You can also adjust the angle of your product photo shadows by clicking on the > Fixed option under > Direction. See the difference compared to the photo right above?
8. Got a ton of product photos and want to add shadows to all of them? Just hit > Start Batch to edit them in bulk:

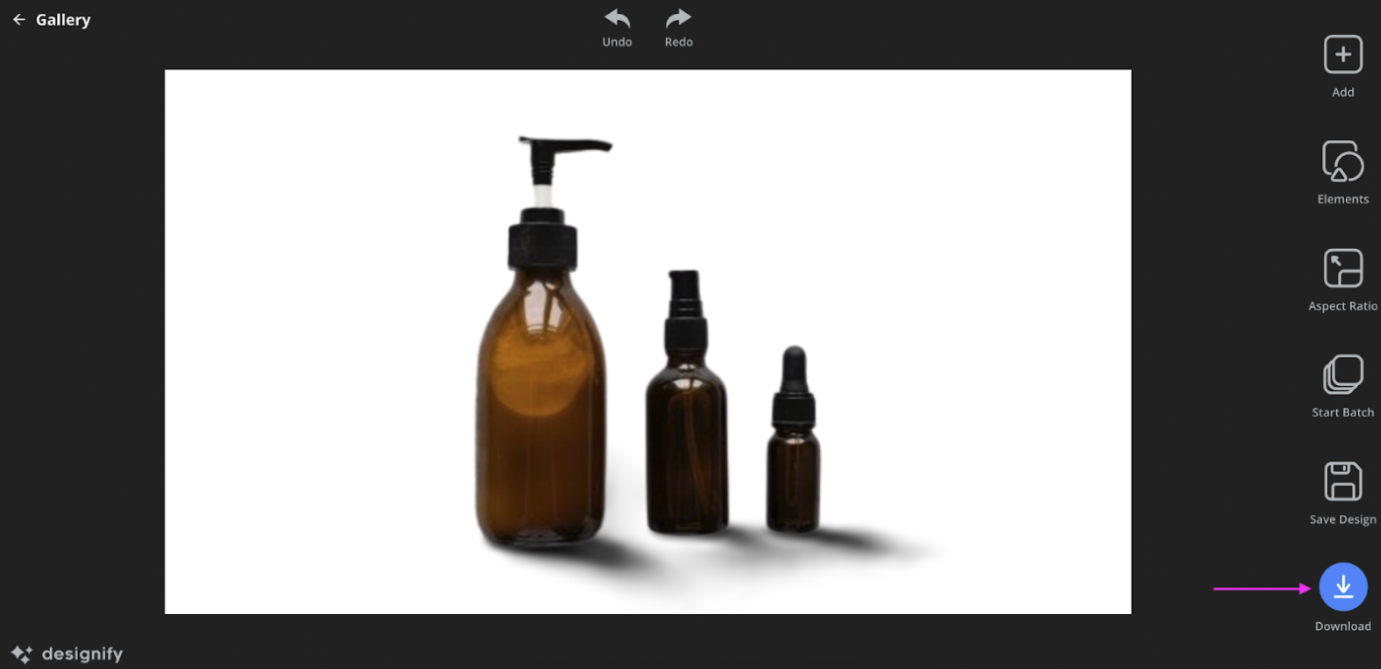
9. Hit the blue > Download button once you're happy with your new image:
Easy enough? We thought so too. Designify automatically adjusts the light source around your product photo, so you can edit in the shadows right after. Aka, less snapping and more selling.
How to add shadows in Photoshop
Got a bit more time at hand or fewer product photos? Let's give Photoshop a go. We recommend downloading the Adobe Creative Cloud to your desktop so you can add gorgeous shadows to your product photos with Photoshop — like this:
So once you've downloaded your Photoshop app from Creative Cloud, let's get designing. We're using version 24.4.1 for our step-by-step:
1. Drag and drop your product photo to the canvas. It's now your new layer:
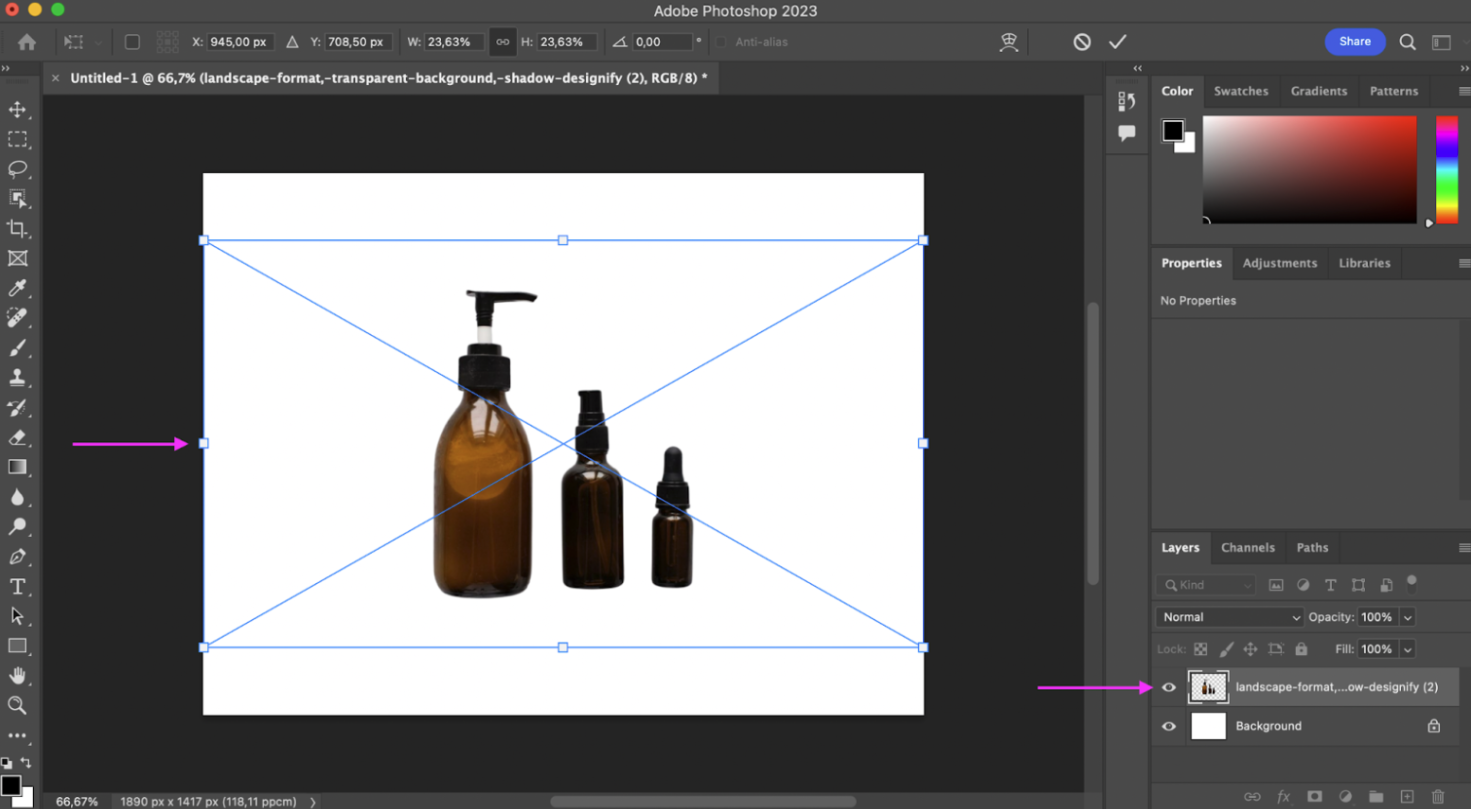
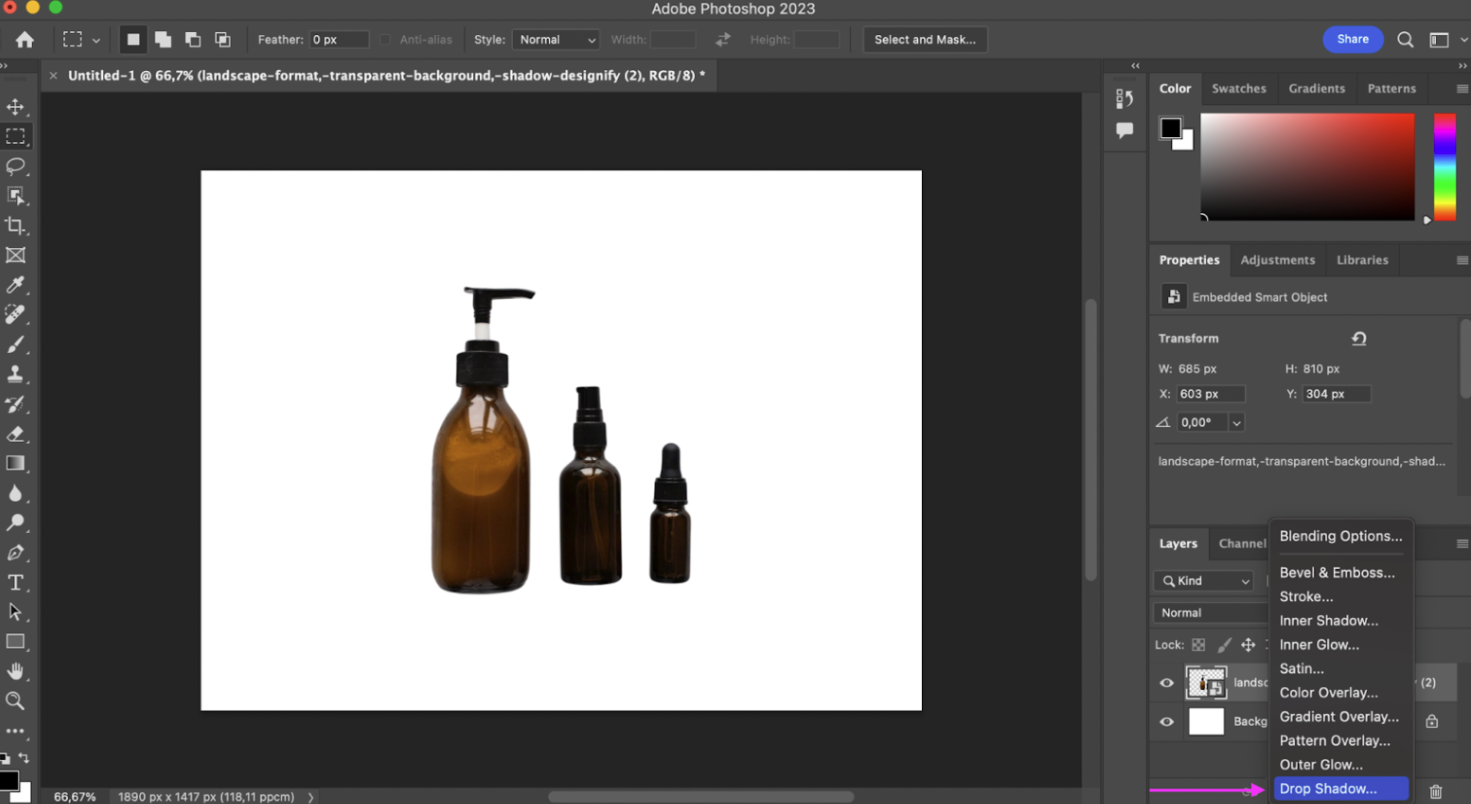
2. Now first click on the new > Layer and then the > fx button on the bottom-right:
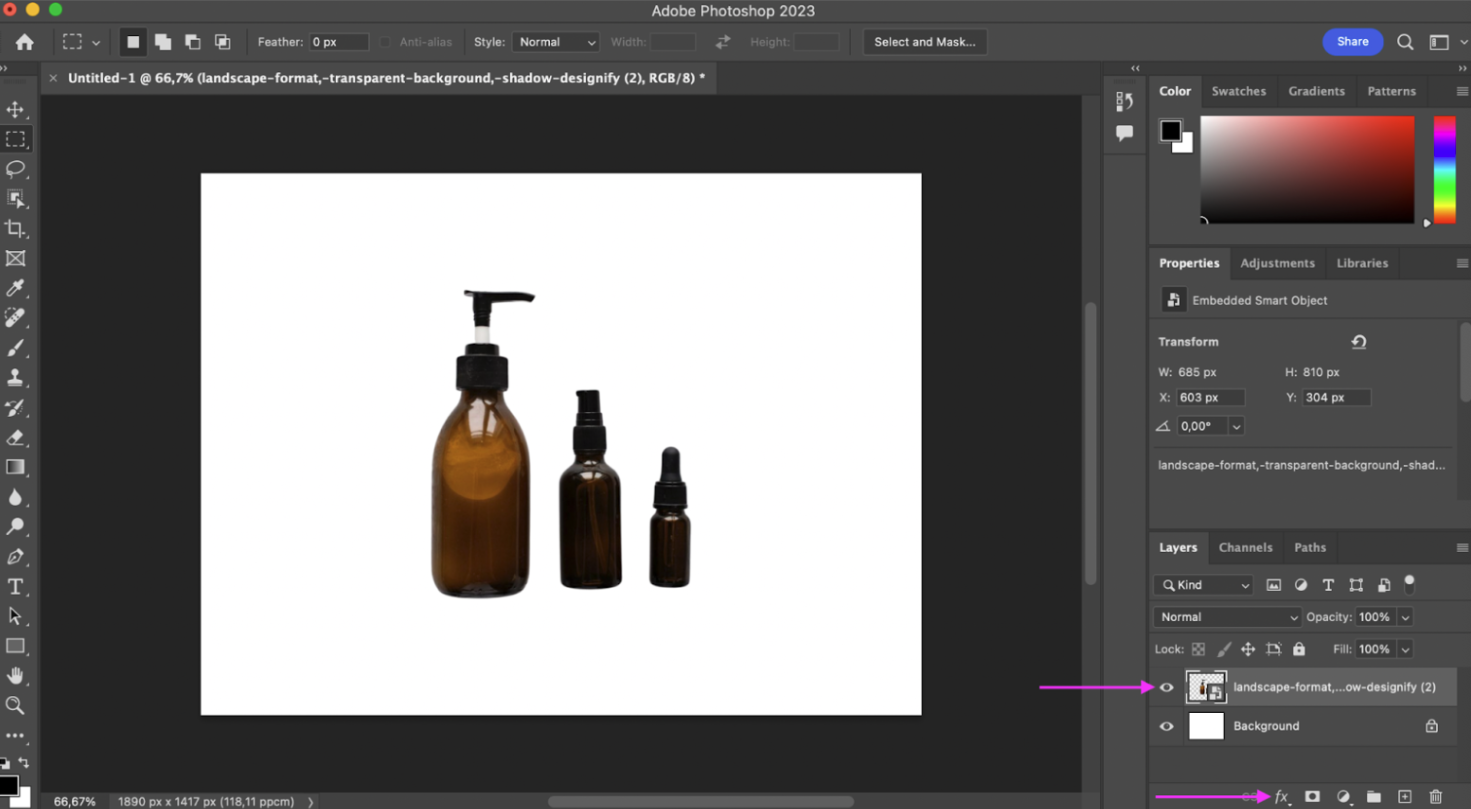
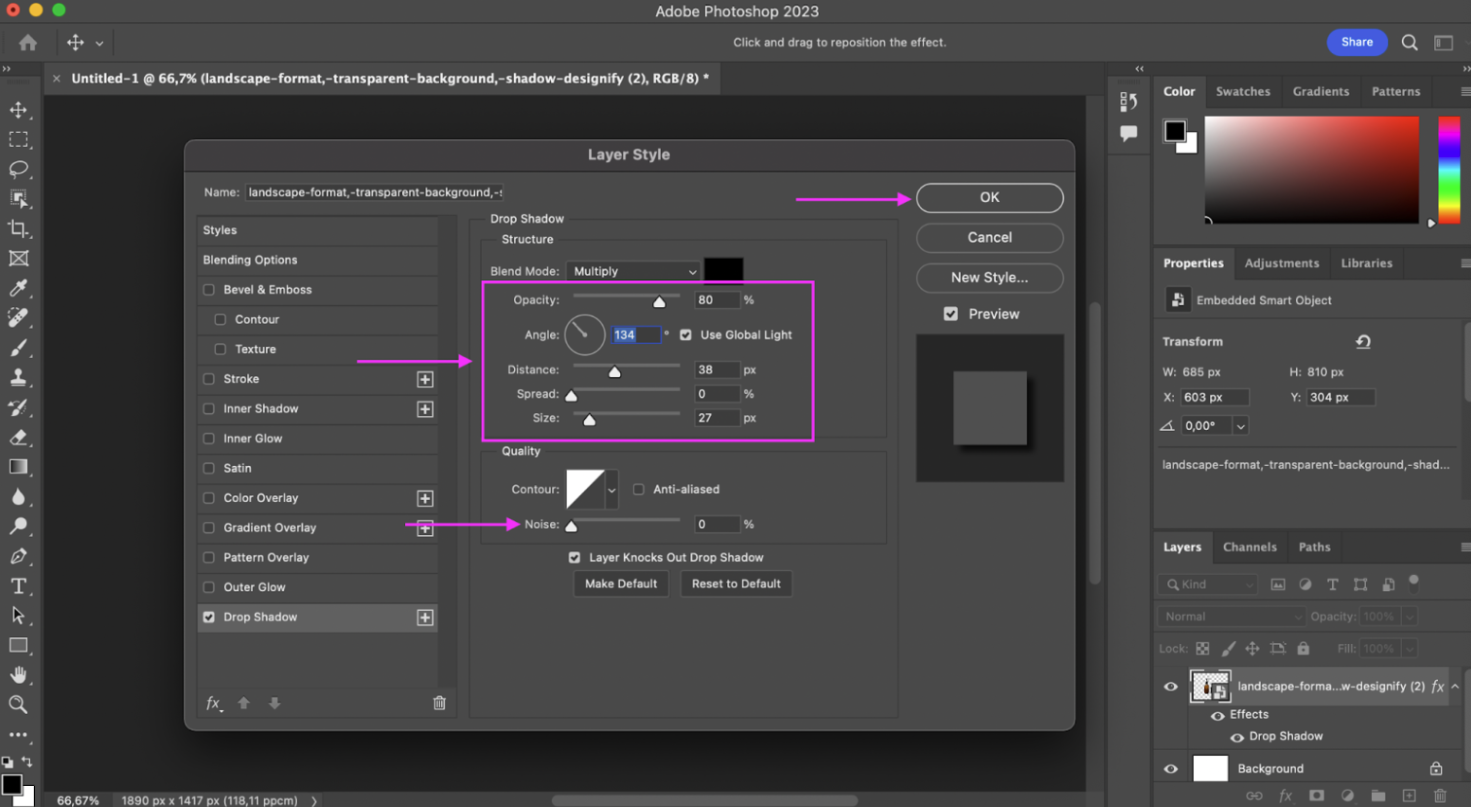
Pick > Drop Shadow:
3. Now play around with the settings until you've found that perfect look. We'd recommend reducing the > Noise and adjusting the > Angle, > Distance, > Spread, and > Size until you're happy with the final result:
4. Once you're ready to download, hit CTRL/CMD + Shift + S and then > Save to store your images in Photoshop format:
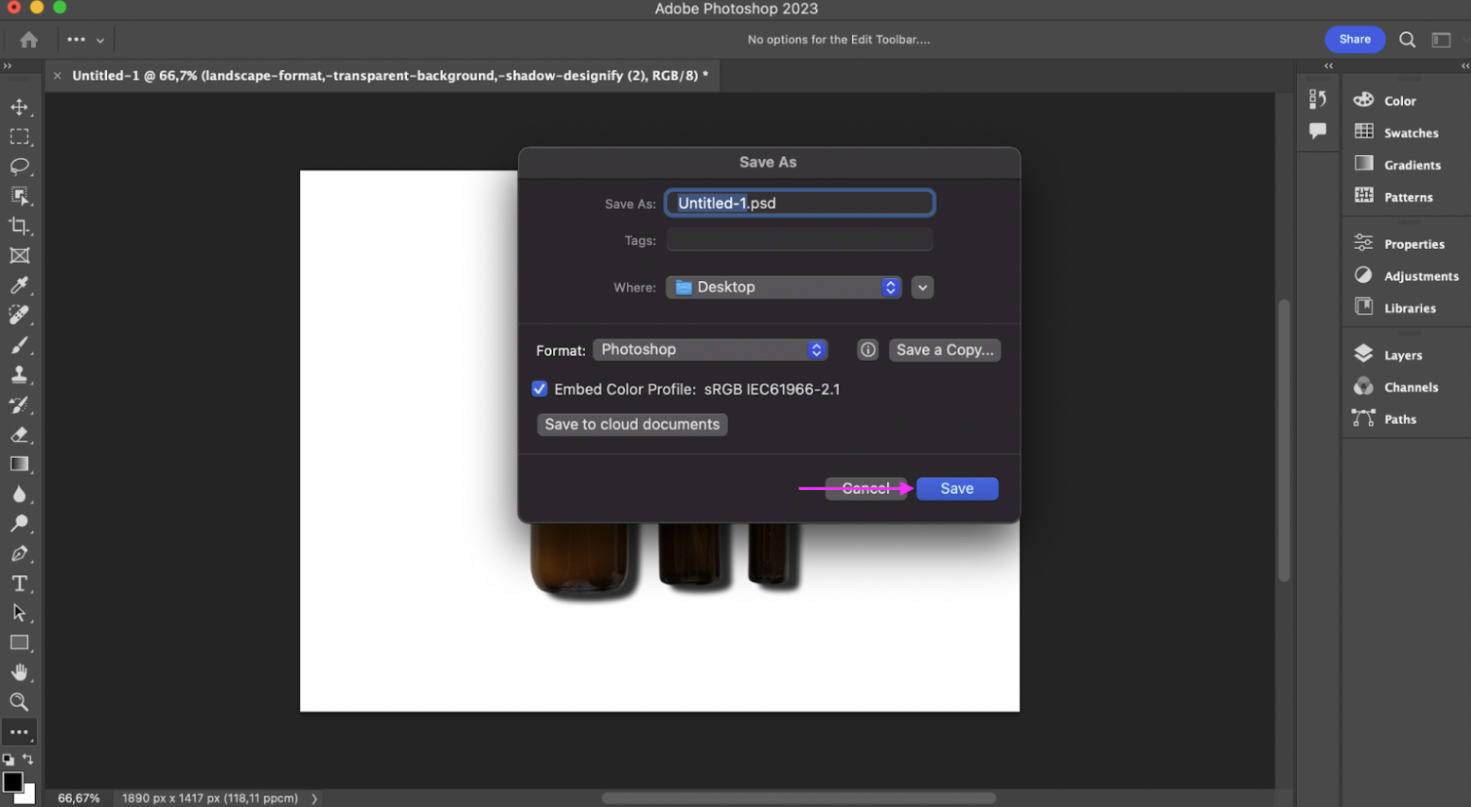
We recommend picking the > TIFF format and then the blue > Save button:

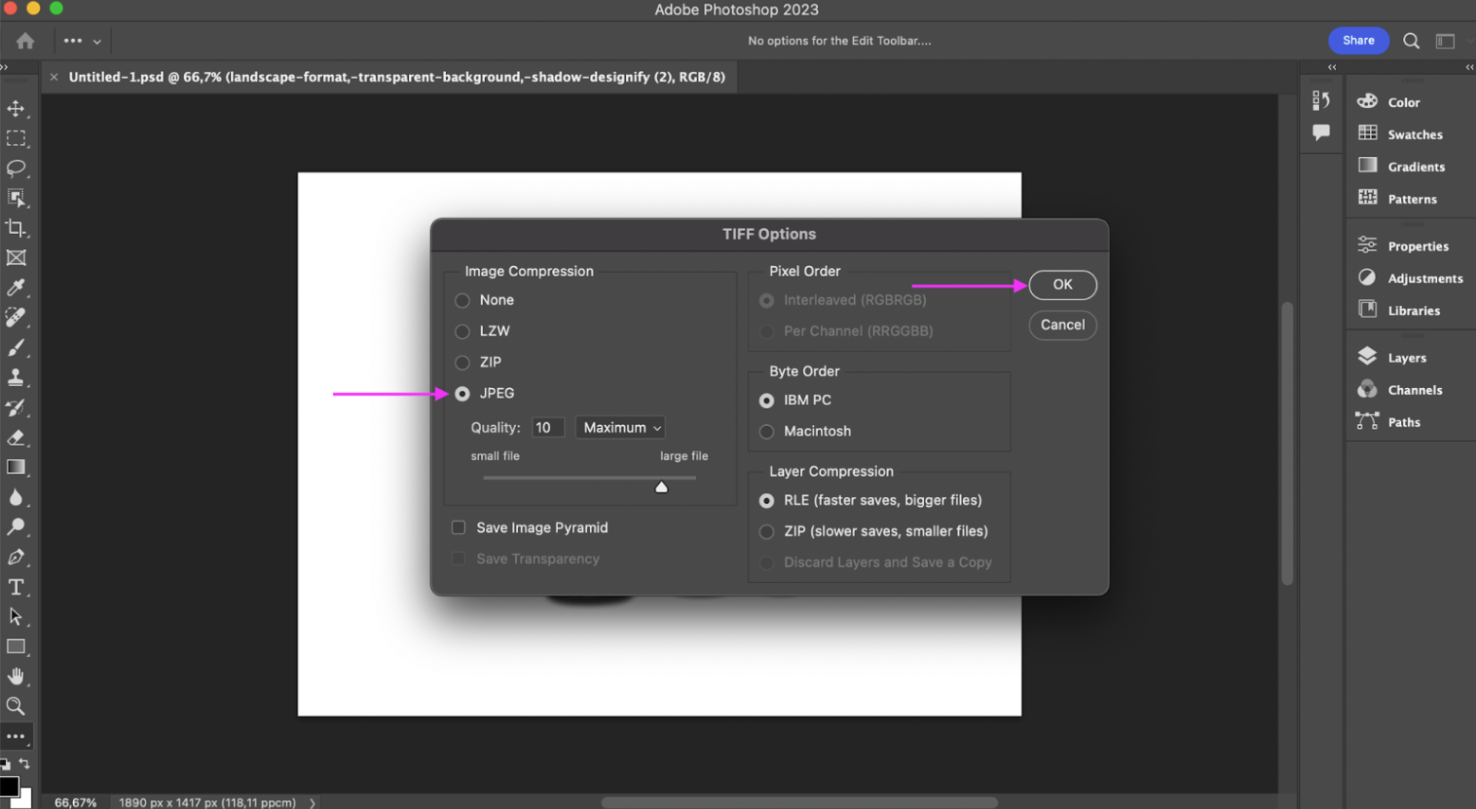
Compress your file to a > JPEG and hit > OK once you're done:
Easy peasy, right? If you like Photoshop, you’re going to love Illustrator. Let’s give it a whirl.
How to add a shadow to images with Illustrator
Once you've got the Adobe Creative Cloud on your desktop, you're in luck: you can use the same app to download Illustrator as well. Just like Photoshop, it helps you quickly and easily add shadows to your product photos — and with even fewer steps. Here's how:
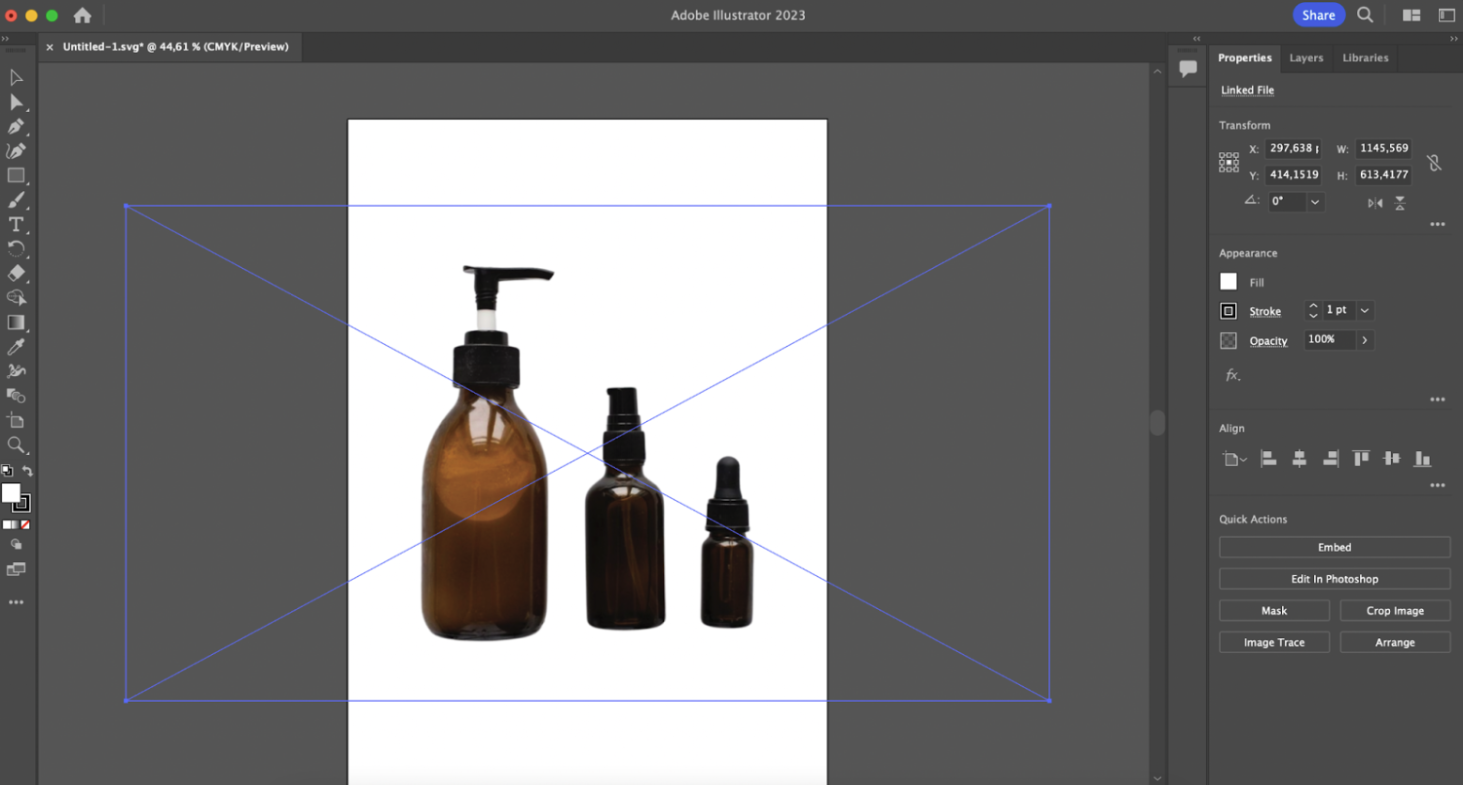
1. Like before, drag and drop your image into the Illustrator canvas:
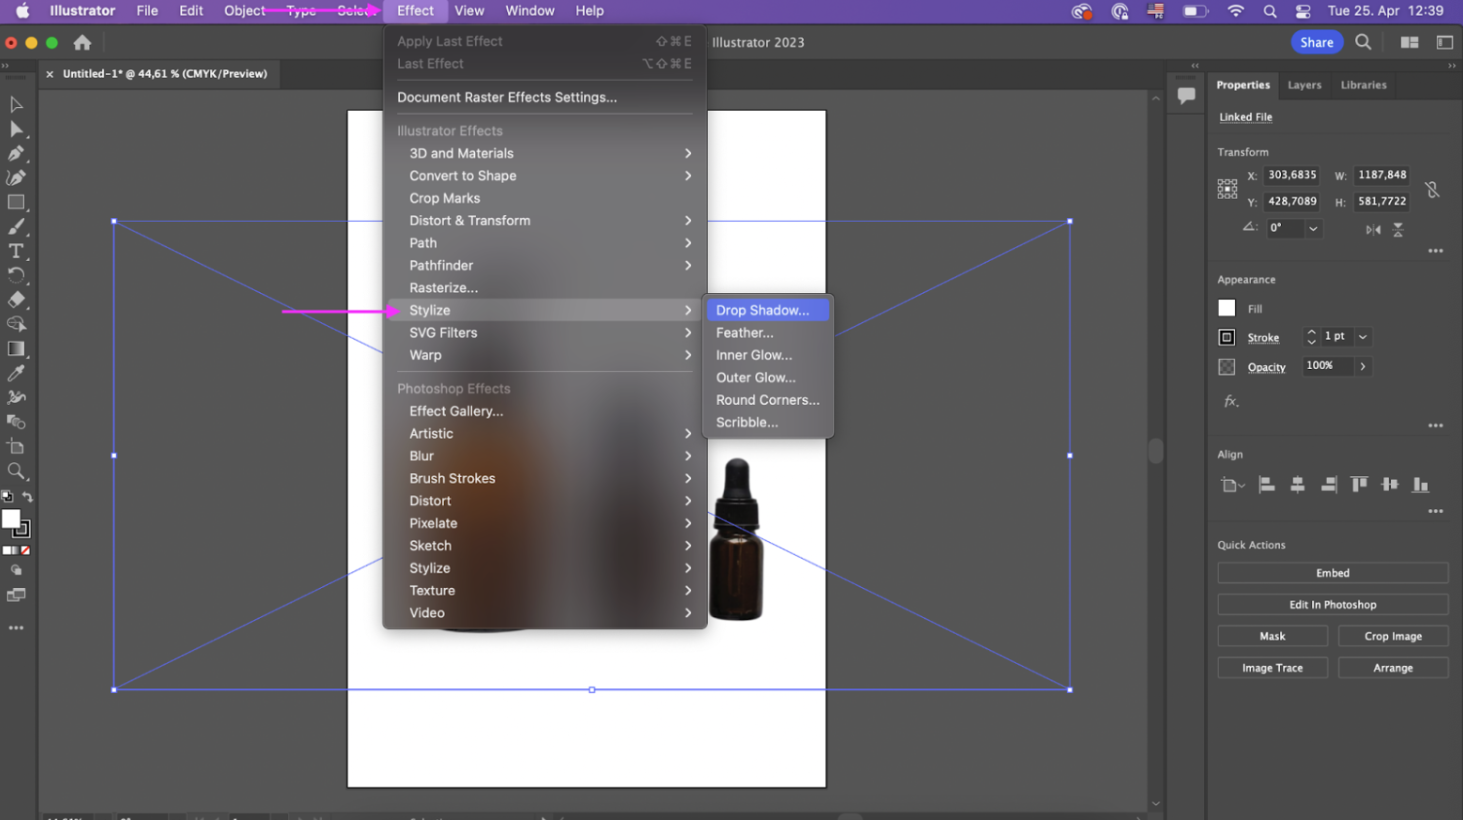
2. Now from the top panel, click on > Effect, > Stylize, and then > Drop Shadow:
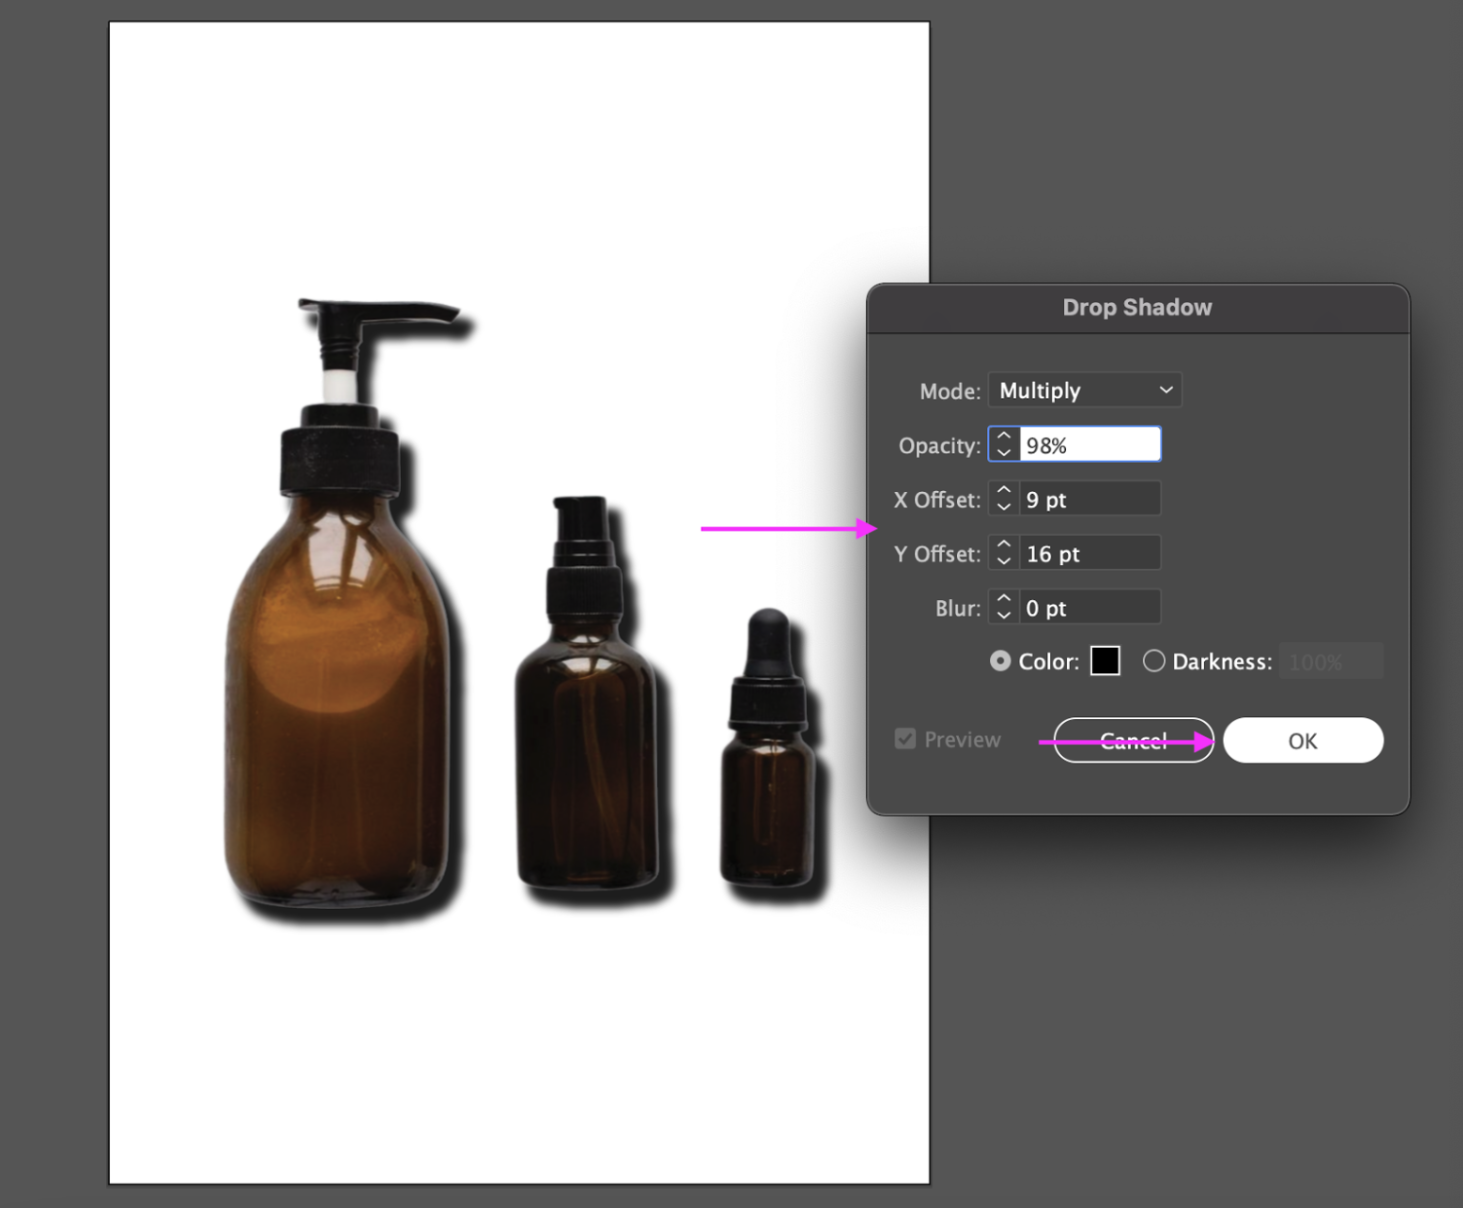
3. Just like in the previous example, play around with the settings until you find that perfect shadow for your images:
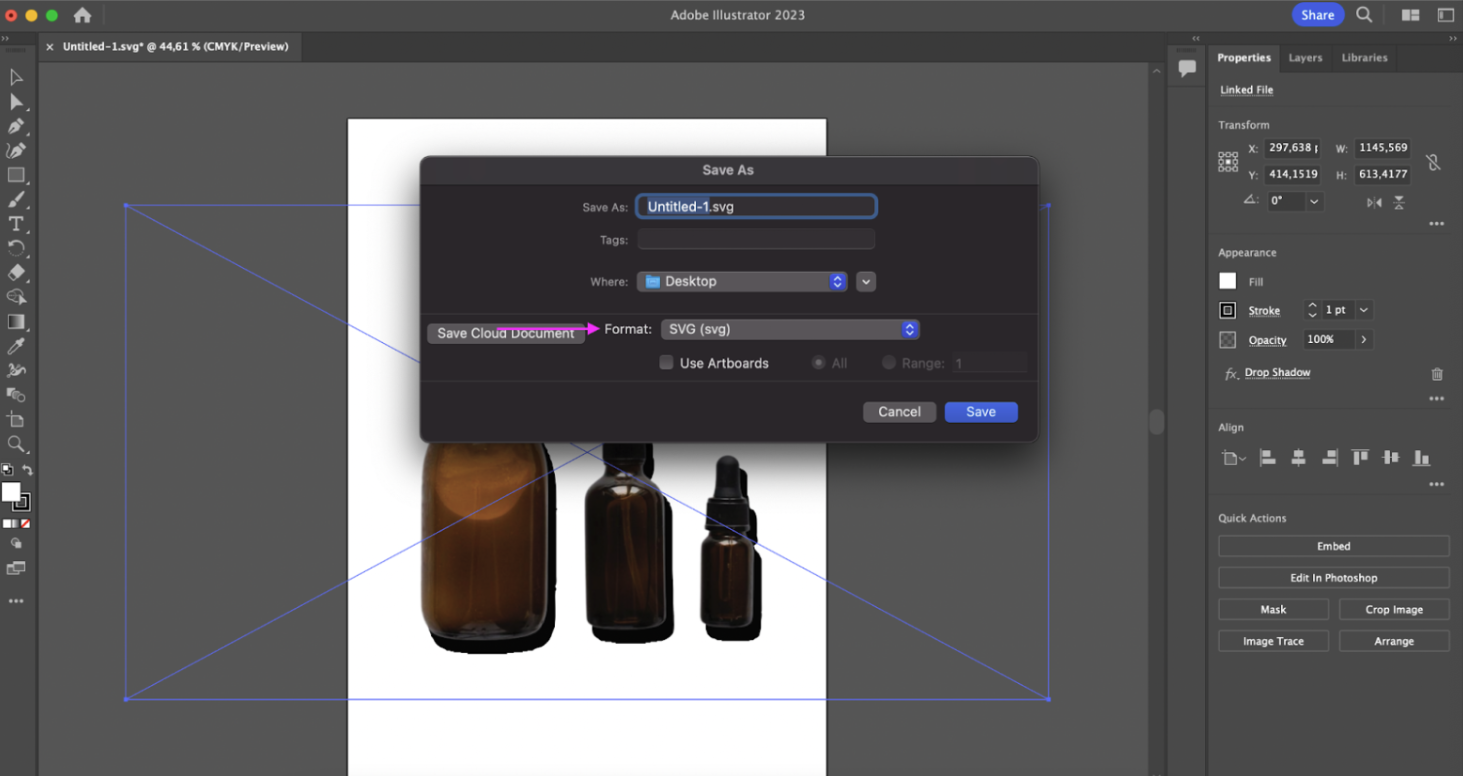
4. Hit > CTRL/CMD + Shift + S to save your image. (We picked the > SVG format.) Hit the blue > Save button once you're ready to download:
Even with all these steps, design tools like Photoshop and Illustrator are pretty easy and enjoyable to use once you've gotten the hang of it. Pro-tip: just make sure the format you save your images in is suitable for your e-commerce platform.
Cast a spotlight on what you’re selling — with product photo shadows

Who’d have thought a bit of shadow was such a great way to cast a spotlight on your goods? Plus, with the right tools, you can transform your product photos into realistic, professional shots in no time.
So here's a wrap-up of how to add shadows to your images, both pre- and post-production:
You can create shadows naturally by using a plain background while shooting. We also recommend you ensure that your lighting is on point and shoot from a standard angle. All best practices that result in clean, professional product photos.
Pressed for time and want to use a simple, automatic tool post-production? Check out Designify. It removes your product photo backgrounds by default so you can add another, more e-commerce-friendly one instead — including one with a readymade shadow.
Want to tweak your product photos a bit? Use Designify's Smart Editor — where you can add shadows, adjust their angle and opacity, and even bulk-edit them to create a whole batch of images.
Got a bit more time at hand and want to get granular with your design? Get your hands on the Adobe Creative Cloud desktop app and give Photoshop or Illustrator a whirl.
If you've got a ton of product photos and not a ton of time, we've got you covered. Head on over to Designify — and let's add that perfect shadow to your images.
Comments
No comments so far.