Are you eager to integrate AI and automation into your business, but feel limited by the lack of in-depth technical expertise or a specialized IT team? Look no further! remove.bg offers a comprehensive, easy-to-follow guide on setting up an API command line-enabled folder right on your desktop.

Experience the convenience of drag-and-drop functionality to remove the backgrounds of multiple images at once. Embrace this swift and straightforward approach to automation and transform your desktop into a dynamic design studio.
目录
What is a Command Line Interface (CLI)?
A Command Line Interface is a tool that runs in the Terminal that is included in every operating system and allows you to run programs and tasks using simple text commands rather than clicking with the mouse.
The remove.bg CLI tool gives you the most power with optimal performance and freedom. While the entire documentation and source code for the CLI tool can be found on remove.bg's website, we've taken the time to give you an easy, step-by-step video tutorial to get you started. Let's go!
If you're looking to dive deeper and see the steps laid out in writing, keep on reading.
How to use the remove.bg CLI tool
If you’re a Mac OS user and have Homebrew installed on your system, you can install it with a simple command:
brew install remove-bg/homebrew-tap/removebg
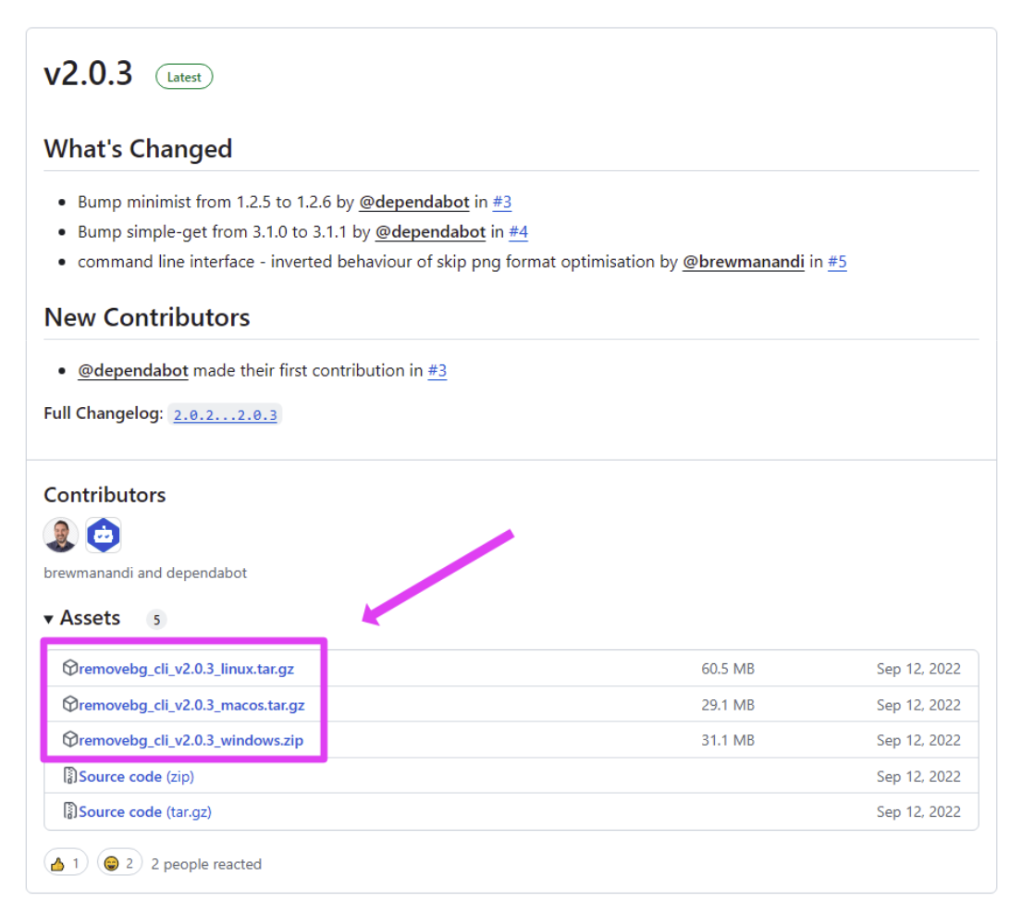
Or you can download the latest stable release for your platform of choice.
Extract the archive file to your destination folder of choice. If you would like to be able to use the CLI tool from anywhere on your computer, make sure to add the path to your > PATH environment variable.
Windows
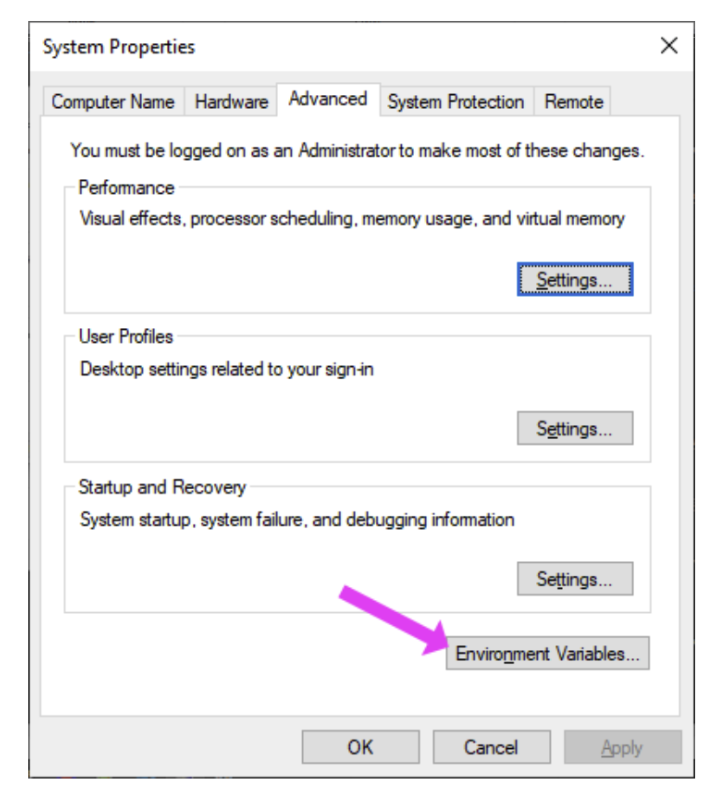
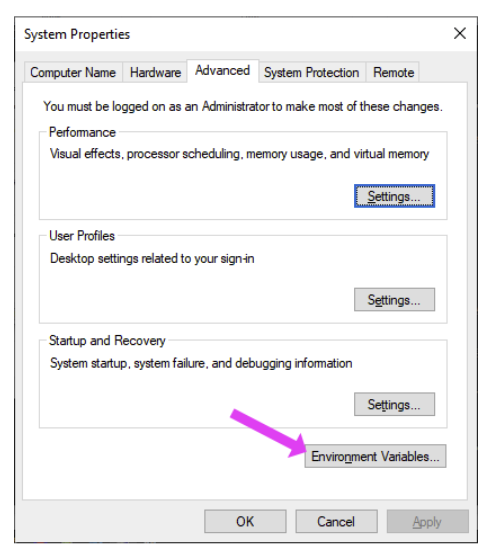
Open the Environment Variables dialog by clicking on the > Start Menu and typing > environment variables and hitting > ENTER.
Click on the button > Environment Variables
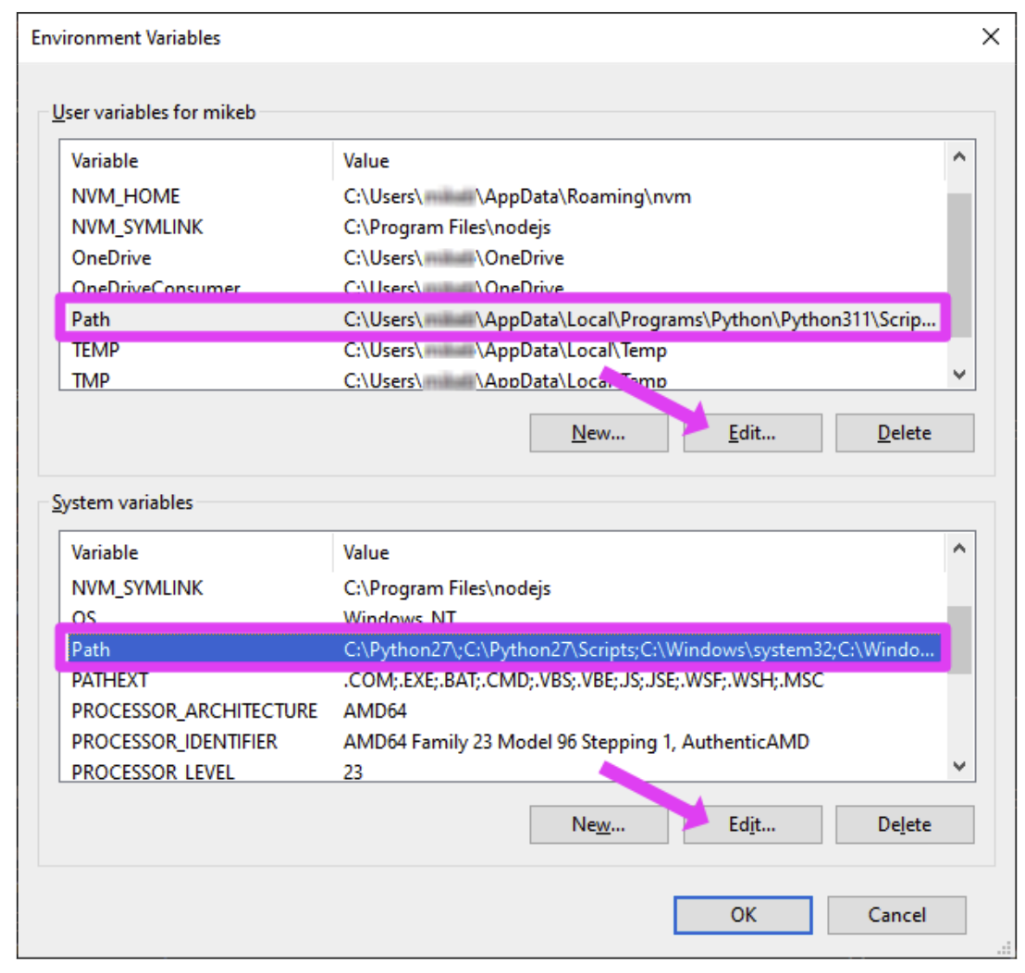
Find the variable named > Path, select it, and hit the button > Edit. The > Path environment variables exist both for your user account and for the entire system. If you would like every user to be able to use the CLI tool, then choose the Path system variable.
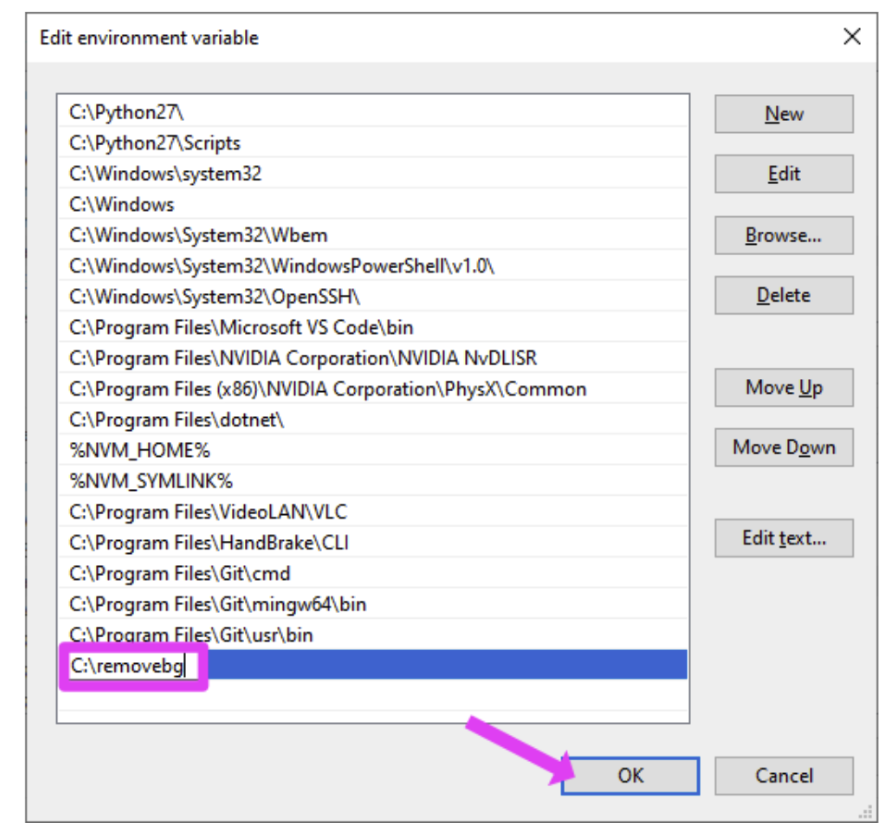
Click the button > New to add a new entry to the Path environment variable.
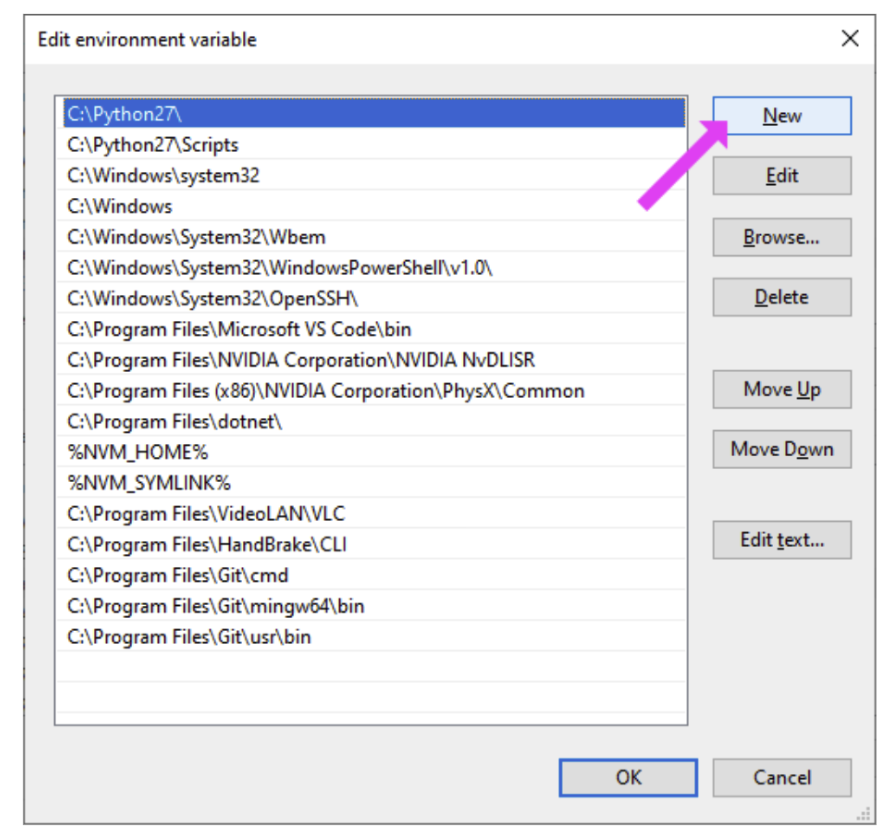
A new input field will appear. Type in the folder location you extracted removebg.exe to, then click > OK.
Mac
In Finder, navigate to your home folder: /Users/<username>. If you’re using macOS Catalina (10.15) or later, create or open the file .zshrc. If you’re using Mojave (10.14) or earlier, the filename is .bashrc. Add the following line and save the file:
export PATH="${PATH}:/path/to/removebg"
Linux
Depending on the shell you’re using, create/edit the file ~/.bashrc or ~/.zshrc and add the following line and save the file:
export PATH="${PATH}:/path/to/removebg"
Retrieve your API key
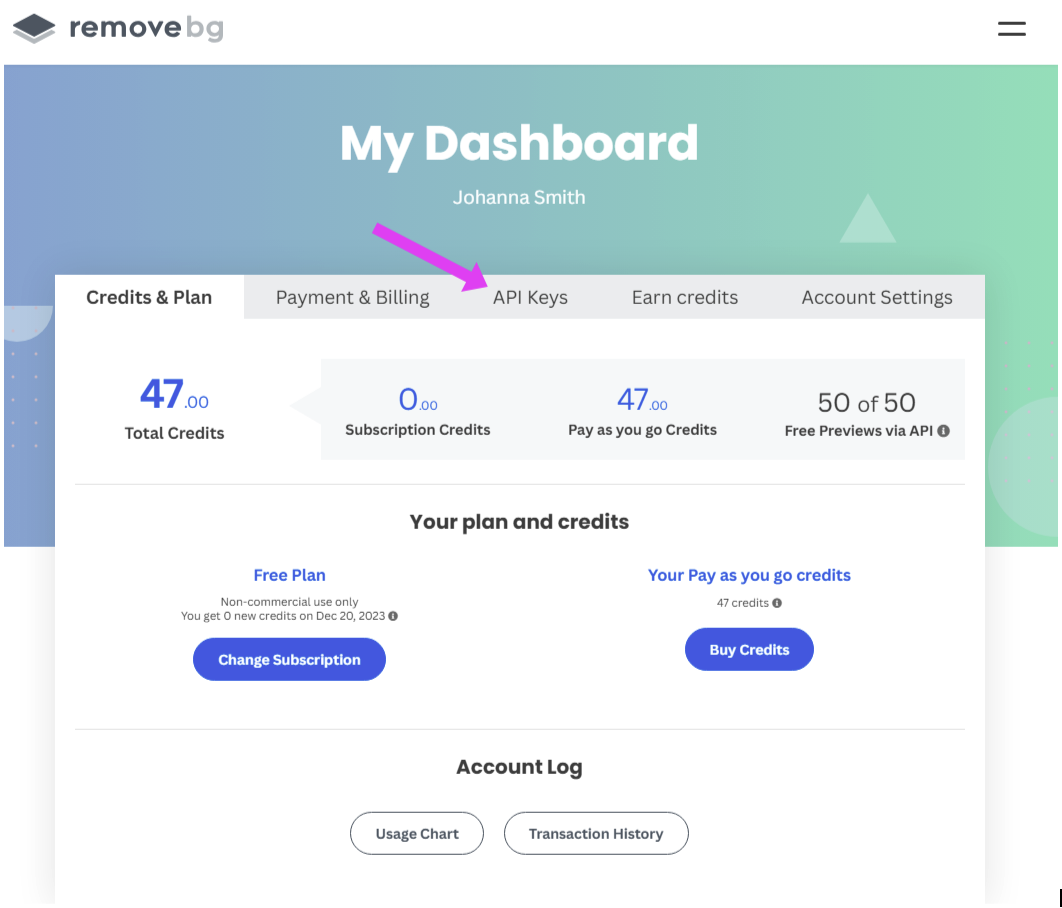
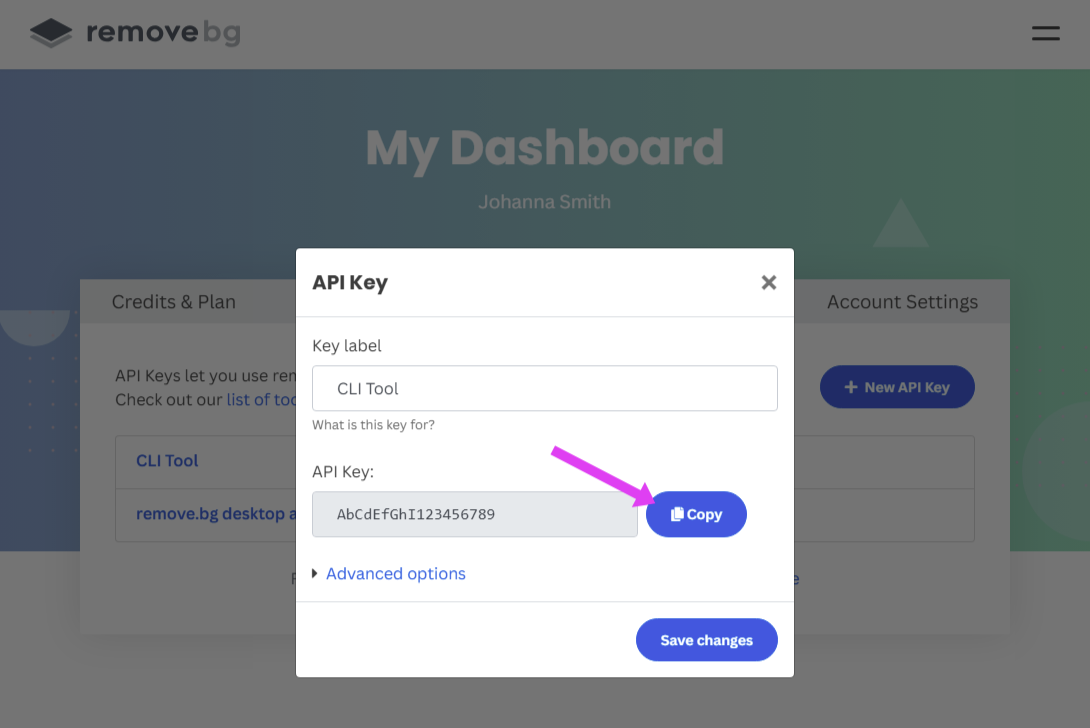
You’ll need your API key every time you use the CLI tool. Log in to your remove.bg dashboard, and click the > API Keys tab.
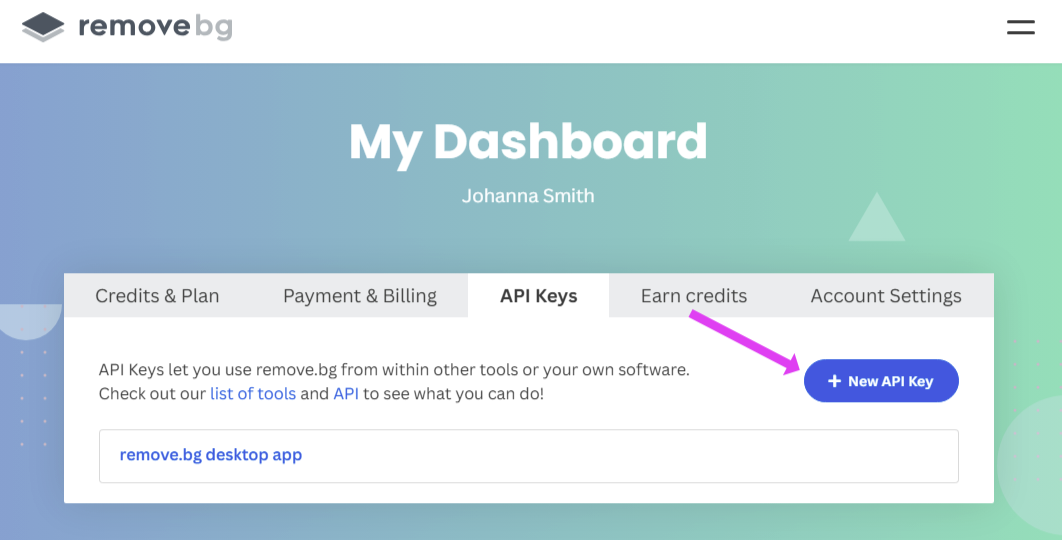
To create a new API key for use with the CLI tool, click on the > New API Key button.
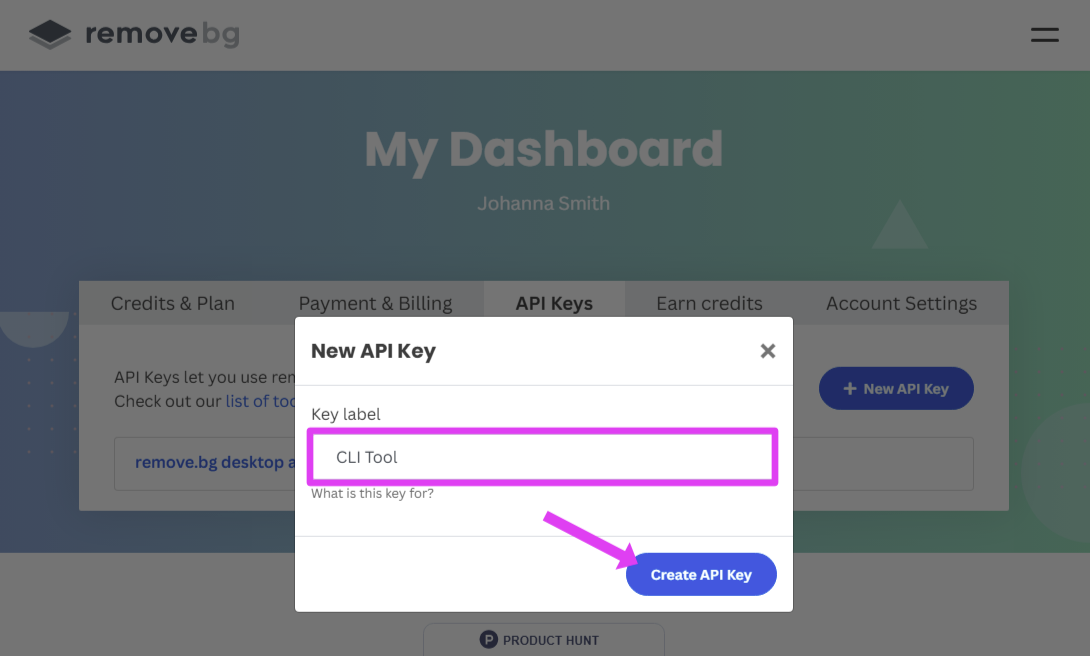
Give the key a meaningful name, like > CLI Tool, and click the > Create API Key button.
Once the key is created, click the > Copy button to copy it to the clipboard.
NOTE: you can save the API key as an environment variable, so you don't have to enter the key every time you use the CLI tool.
Windows
Open the Environment Variables dialog by clicking on the Start Menu, typing environment variables, and hitting ENTER.
Click on the button > Environment Variables.
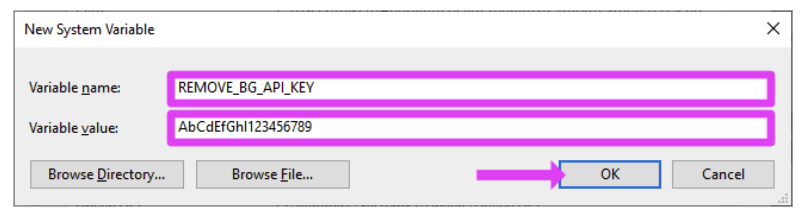
Click on the button > New. You can choose to have the environment variable applicable only for your user, or for everyone who uses the system.

Enter REMOVE_BG_API_KEY as the variable name, and enter your API key as the value. Then click the > OK button.
Mac/Linux
Simply add the following line to either ~/.bashrc or ~/.zshrc file:
export REMOVE_BG_API_KEY=”your_key_here”
Execute your first command
That's all the setup we had to do, so now we can get right to it!
Windows
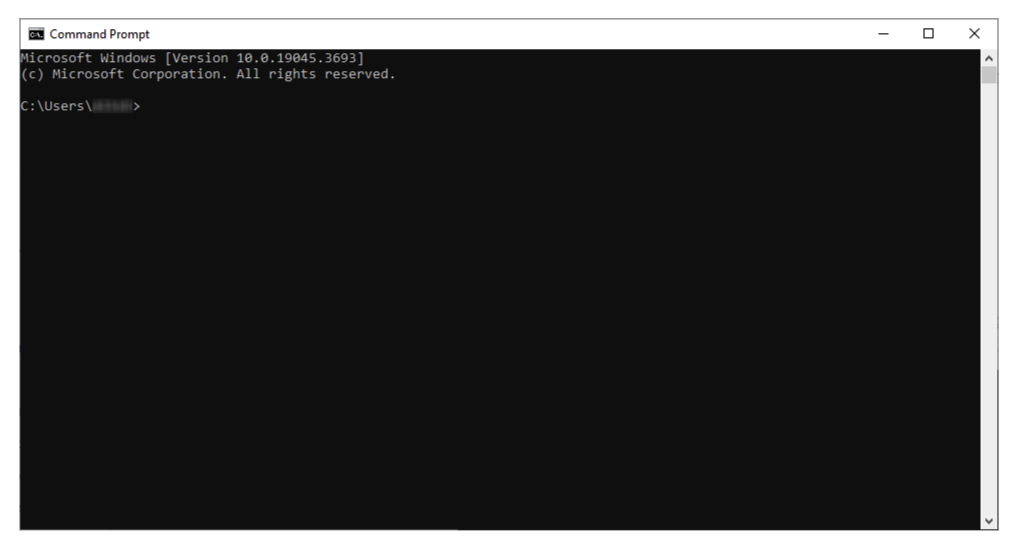
Open the Command Prompt by clicking on the Start Menu, typing cmd, and hitting ENTER.
Mac
Open the terminal by clicking the Launchpad icon, then searching for > terminal.
Linux
Open the terminal in accordance with your Linux distribution.
Command anatomy
To execute a command using the CLI tool, you must follow the basic structure:
removebg [options] file...
If you didn’t update your PATH environment variable, you need to give the full path of the executable:
Windows:
C:\removebg\removebg [options] file...
Mac/Linux:
/path/to/removebg/removebg [options] file...
For the [options] part, each option follows the same structure:
--option value
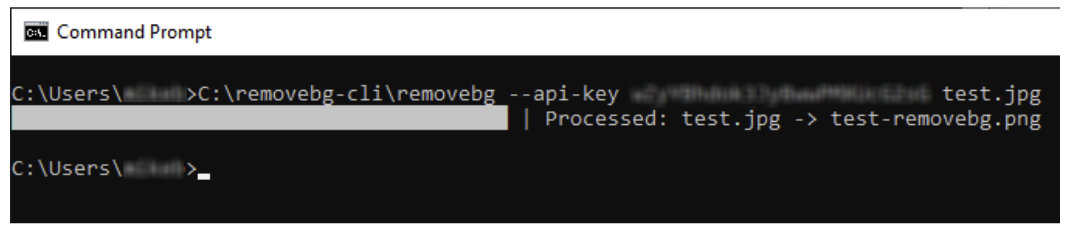
So, for example, if you didn't add REMOVE_BG_API_KEY to your environment variables, you must always enter the API key as an option:
removebg --api-key your_api_key_here
The file part of the command is where you tell the CLI tool which files you'd like to process. Let's have a look at some useful examples to get you started.
Processing a single image
To remove the background of a single image:
Windows:
removebg C:\path\to\image.png
Mac/Linux:
removebg /path/to/image.png
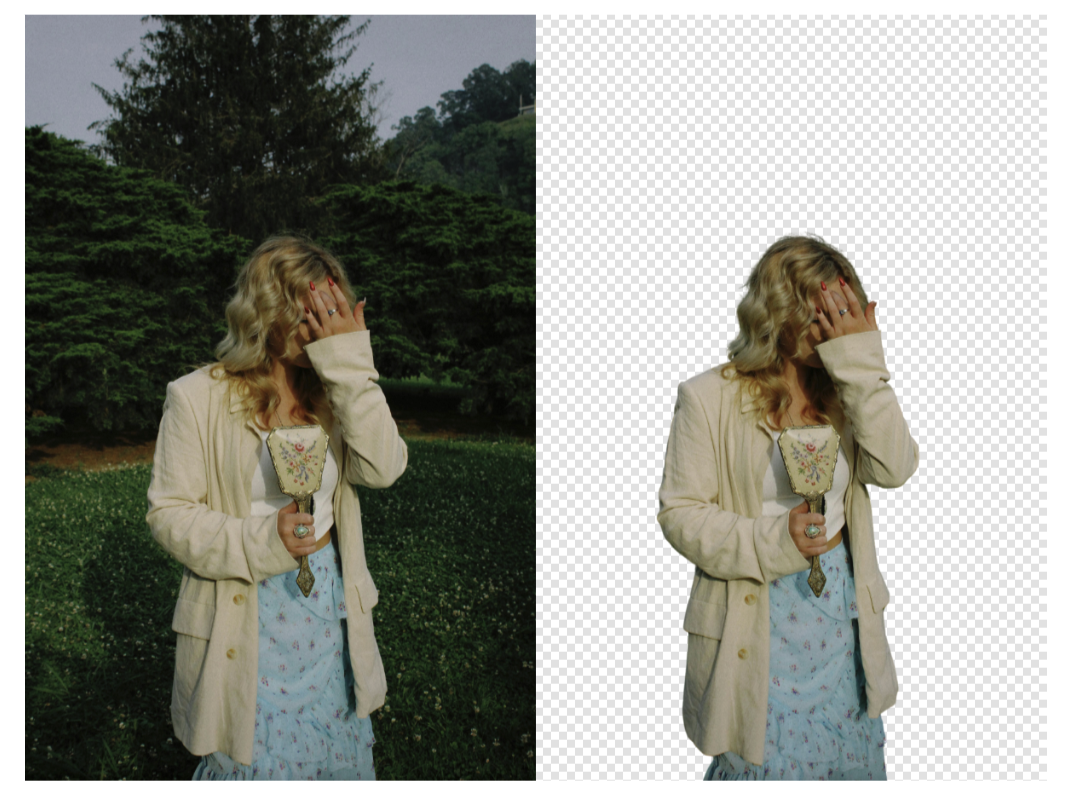
This will remove the background of the image and save it in the same directory as image-removebg.png.
Processing a folder of images
If you have multiple images in a folder and want to remove the background, use the command:
Windows:
removebg C:\path\to\images\*.{jpg,jpeg,png}
Mac/Linux:
removebg /path/to/images/*.{jpg,jpeg,png}
This will remove the background of all the .jpg, .jpeg, and .png files in the specified directory and save them in the same directory as image-removebg.png.
Saving to a different directory
If you want to save the files to a different directory, you can simply use the --output-directory option:
Windows:
removebg --output-directory C:\path\to\images\output C:\path\to\images\*.{jpg,jpeg,png}
Mac/Linux:
removebg --output-directory /path/to/images/output /path/to/images/*.{jpg,jpeg,png}
If the specified output directory doesn’t exist, it will be created for you automatically.
Giving the AI a hint as to what’s in the foreground
You can also tell the AI what kind of object it should be looking for as the foreground object with the --type option. You can enter any text, but try to use something generic and only one word, like “person”, “car”, or “toothbrush”:
Windows:
removebg --type camera C:\path\to\images\*.{jpg,jpeg,png}
Mac/Linux:
removebg --type camera /path/to/images/*.{jpg,jpeg,png}
Setting the output format
By default, the output file will be in PNG format, which is the only format supporting transparency. However, you can override this and save it as a JPG if so desired with the --format option:
Windows:
removebg --format jpg C:\path\to\images\*.{jpg,jpeg,png}
Mac/Linux:
removebg --format jpg /path/to/images/*.{jpg,jpeg,png}
Setting the output size
By default the output file has the same size as the input file. If you want to resize the images, you can use the --size option, which has the following values:
auto: highest available resolution based on the number of credits and original file size (this is the default)
full: original resolution up to 25 megapixels for JPG and 10 megapixels for PNG
preview: 0.25 megapixels
Windows:
removebg --size preview C:\path\to\images\output C:\path\to\images\*.{jpg,jpeg,png}
Mac/Linux:
removebg --size preview /path/to/images/output /path/to/images/*.{jpg,jpeg,png}
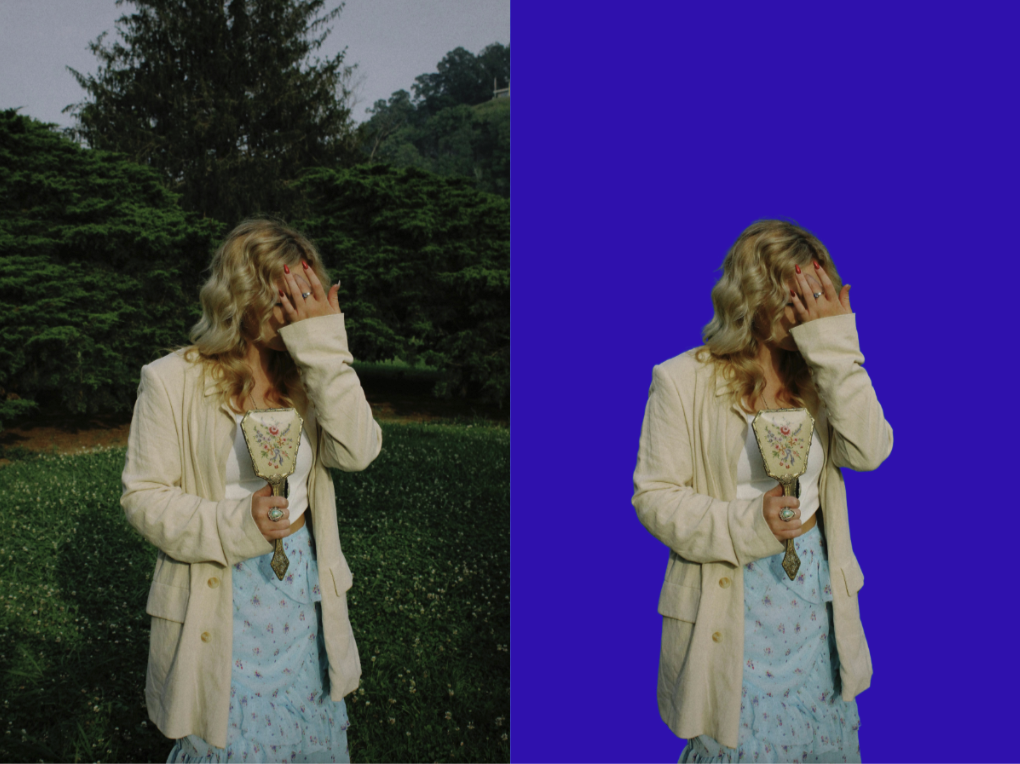
Adding a background color
If you want to add a background color to all images instead of letting it just be transparent, you can simply use the --bg-color option with a RGB hex color code (without the #) or just the color name (e.g. “blue”):
Windows:
removebg --bg-color 0031BA C:\path\to\images\*.{jpg,jpeg,png}
Mac/Linux:
removebg --bg-color 0031BA /path/to/images/*.{jpg,jpeg,png}
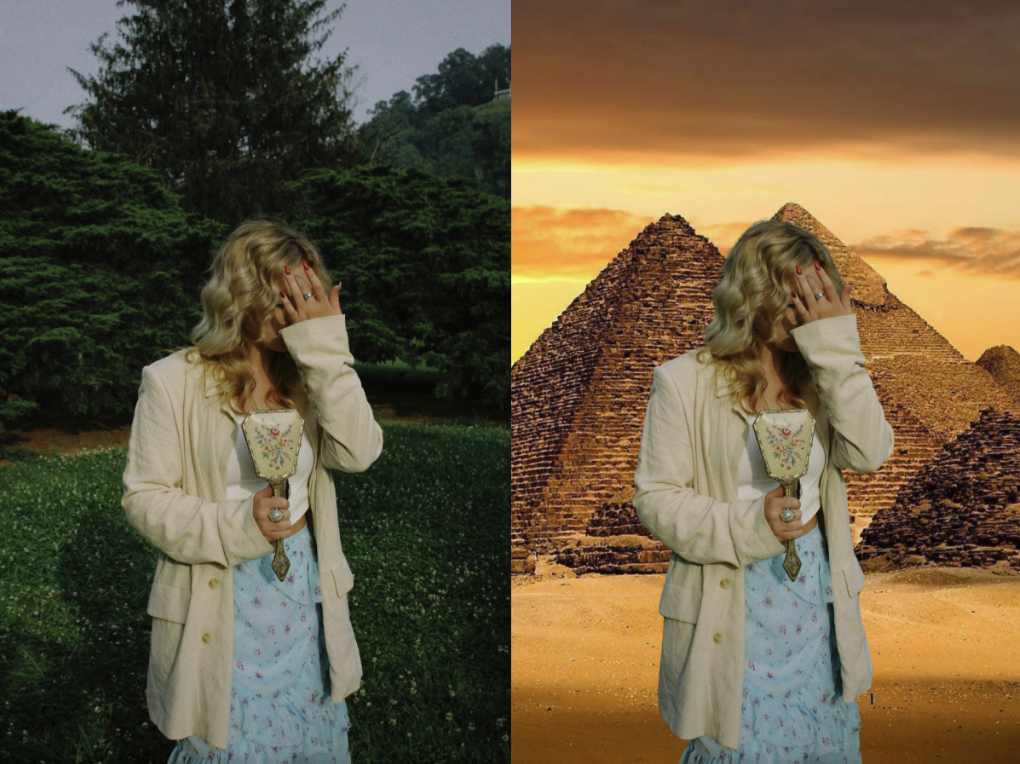
Adding a background image
If you want to add a background image to all images instead of a solid color, you can simply use the --bg-image-file option:
Windows:
removebg --bg-image-file C:\path\to\bg-image.jpg C:\path\to\images\*.{jpg,jpeg,png}
Mac/Linux:
removebg --bg-image-file /path/to/bg-image.jpg /path/to/images/*.{jpg,jpeg,png}
remove.bg CLI tool: leverage AI & automation
In this guide, we’ve seen how we can remove the backgrounds of multiple files at once, with multiple options, all with just a single command.
The Command Line Interface tool empowers you to not only eliminate backgrounds but also to substitute them with a chosen background color or a different image. Additionally, it allows you to modify the output format and adjust the size to suit your needs.
It is a super helpful way to process large batches of files in an automated or semi-automated way. If you get stuck or have any questions not covered in this guide, check out our help center. If you are interested in knowing more about remove.bg's high-volume solutions, contact us directly. Happy background removing!
评论
目前尚无评论。